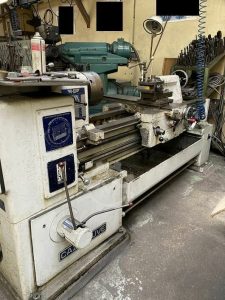
From Factory Floor to Your Workshop: Evaluating a Pre-Owned , Used , Secondhand, Surplus CNC Machines Before Purchase Jetco JML-6630Y Lathe Universal made in China
Here’s how I would approach evaluating a pre-owned / secondhand / surplus Jetco JML-6630Y universal / CNC lathe (Chinese origin, presumably) from “factory floor to your workshop.” Use this as a detailed inspection guide plus decision framework.
Preliminary / Pre-Screening Steps (Before Visiting Site)
- Establish basic information & documentation
- Ask for machine’s nameplate photos (mechanical & electrical) showing model variant (Y suffix), serial number, manufacturer, year of manufacture.
- Request specification sheets / brochures, wiring diagrams, control / CNC manuals.
- Get operating / usage history: power-on hours, cutting / load hours, what materials & duty were run.
- Obtain maintenance / service records: whether spindle rebuilds, guideway repairs, etc.
- Ask about prior modifications, retrofits, or part replacements.
- Request photos / video of the machine in operation (axis moves, spindle turning, tool changes).
- Ask for list of included tooling / accessories / spare parts.
- Ask reason for sale (upgrade, idle, breakdown).
- Verify shop conditions where it ran (coolant type, chip control, environment).
- Verify claimed specs / variant Because the JML-6630 family is a larger universal lathe series, check whether “Y” implies CNC variant, control type, or certain features. For comparison, the JML-6630B model is often listed with:
- Swing over bed: 660 mm
- Spindle bore: ~ 105 mm
- Bridge gap swing: 870 mm
- Distance between centers: ~ 3,000 mm
- Logistics & site planning
- Confirm floor capacity, crane / rigging access, machine weight.
- Confirm your workshop’s utilities (power voltage, phase, circuit capacity, cooling, chip removal).
- Determine how the machine will be relocated, leveled, installed.
If the seller fails to provide reliable documentation or is evasive, treat with caution.
On-Site Inspection & Mechanical Checks
Once on site, bring your measurement tools (dial indicators, micrometers, test bars) and (if possible) a machinist / technician. Proceed methodically.
1. Structural & Frame Inspection
- Inspect the bed, base, frame for cracks, repairs, welds, distortion.
- Examine the sliding guideways / ways, cross slide, apron, carriage: look for scoring, pitting, uneven wear, corrosion.
- Check way covers, guards, bellows; any missing or poorly maintained covers are red flags.
- Check how the lathe is anchored, levelled, shimmed; evidence of shifting or settlement.
- Inspect chuck / spindle nose area for damage or wear.
- Inspect the tailstock or any center assemblies for alignment and wear.
Move parts (by hand or slow jog) to feel for roughness, stiction, or binding.
2. Kinematic / Motion / Backlash Tests
- Jog / move the X (cross slide) and Z (bed travel) axes slowly over their full span; feel for inconsistent motion, catches, or rough patches.
- Measure backlash / lost motion in both axes using a dial indicator (push-pull test) in multiple positions along the travel.
- Move to extremes and reverse to detect hysteresis or dead band.
- Inspect the feed screws / ball screws / leadscrews, nuts, couplings for looseness, wear, or backlash.
- Command faster feed or traverse (if safe) to detect vibration or irregular motion.
3. Spindle / Main Drive & Tool Holding
- Run the spindle at various RPMs (low, mid, high) and listen for noise, roughness, or vibration.
- Use a test bar or gauge + dial indicator to check spindle runout at the nose.
- Monitor spindle bearing temperature during short runs.
- Check acceleration / deceleration behavior, look for overshoot or chatter.
- Inspect chuck mounting, jaws, chuck backplate for wear or misfit.
- If the lathe has tool turret, driven tooling, or special attachments, test their operation (indexing, live tool spin, etc.).
4. Control / Electrical / Electronics Inspection
- Open the electrical / control cabinet and inspect wiring, terminal blocks, connectors, relays, fuses. Look for discoloration, melted insulation, burnt components.
- Check cable routing, shielding, strain reliefs, protective conduits.
- Power up the control panel; test all buttons, control knobs, emergency stops, limit switches, interlocks.
- Navigate the CNC (if CNC version): check software menus, alarm logs, parameter memory, offsets, tool tables.
- Test safety interlocks, door safety circuits, limit switches.
- Check grounding and insulation integrity.
Operational & Performance Testing (Live Tests)
If the seller permits, test the machine under motion and load. This is often the most revealing part.
- Perform a dry run (no cut) of a sample turning program to verify coordinated motion, toolpath, axis sequencing.
- Run a short test cut (on mild material) to check surface finish, chatter, dimensional accuracy.
- Run the machine under load for at least 30–60 min; re-check critical measurements (backlash, runout, alignment) after warm-up to detect drift.
- Repeat movement (go to point → retract → return) multiple times to check repeatability.
- Cycle tool changes / turret indexing repeatedly to test reliability.
- If any special features (C-axis, live tooling) are present, test them under load if possible.
Note whether performance degrades over time (due to heat or instability).
Precision / Metrology Checks & Measurement
Because precision is key, you should perform metrology checks:
- Use known gauge blocks, test bars, or calibration artifacts to check straightness, alignment, and runout.
- Check repeatability: go to a known reference point multiple times and measure deviations.
- Inspect concentricity, circularity, and deviation on test samples.
- After machine has warmed, re-check backlash, alignment, and runout to see if there is drift.
- Compare your measured values to acceptable tolerances for your intended use and to published or claimed specs.
Infrastructure / Installation & Risks
- Confirm that your shop floor’s load-bearing capacity is sufficient.
- Verify rigging, lifting points, access, and movement paths.
- Confirm power, cooling, chip handling, ventilation, and maintenance access.
- Consider maintenance space and access to all sides for servicing.
- Assess spare part availability—especially for Jetco parts, control modules, electronics, spindles etc.
Post-Inspection Analysis & Decision Criteria
After your inspection and testing, compile your findings and weigh whether to accept, negotiate, or reject.
Look at:
- Spec deviations: If actual travels, spindle bore, or features differ significantly from claimed, that’s a negotiation point.
- Wear & damages: If guideways, screws, spindle, or major components show excessive wear, the cost to refurbish may be prohibitive.
- Spindle / drive health: Bearing noise, vibration, high runout are serious red flags.
- Control / electronics condition: Obsolete or damaged controls or wiring can lead to high repair costs.
- Test cut performance: If cuts are stable and within tolerance, that’s a strong positive.
- Thermal drift / instability: If accuracy shifts over time or warm-up, that weakens the machine’s value.
- Parts / support ecosystem: Can you get spare components for Jetco in your country/region?
- Repair / refurbishment cost vs value: Estimate the cost to fix any defects and compare it to the machine’s residual value or alternative machines.
- Warranty / guarantee: Negotiate test-cut guarantee, parts inclusion, return clause, or short-term warranty based on what defects you found.
If too many serious issues appear or repair costs are unpredictable, it may be safer to walk away.