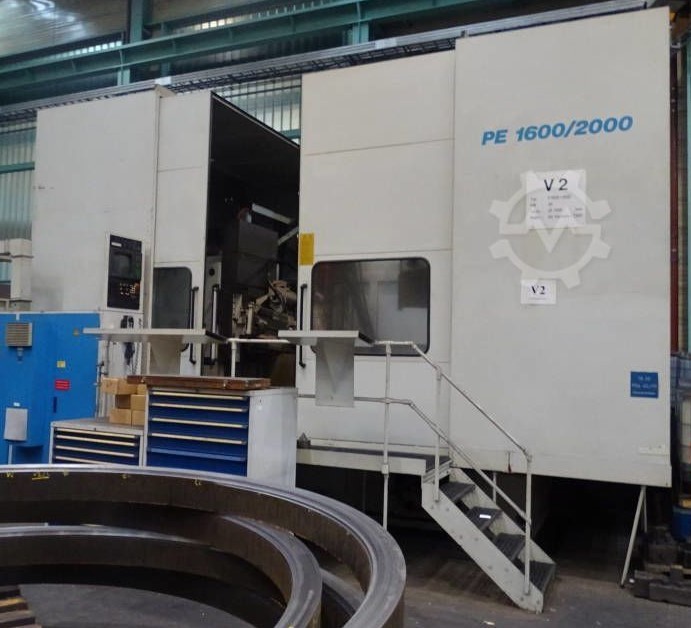
From Factory Floor to Your Workshop: Evaluating a Pre-Owned , Used , Secondhand, Surplus CNC Machines Before Purchase Gleason Pfauter PE 1600/2000 CNC Gear Hobbing made in Germany
Here’s a detailed guide you can use when evaluating a pre-owned / surplus Gleason Pfauter PE 1600/2000 gear hobbing (vertical / universal) machine (made in Germany). Because gear hobbing machines are complex and precise, you’ll want to be extra cautious. Below is a structured approach (pre-screening, site inspection, operational testing, decision criteria) plus model-specific notes based on publicly available specs.
Known / Reference Specs & Model Context
Before going in, it’s helpful to know what typical or published specs are. That way you can spot exaggerations or red flags.
From various listings:
- The PE 1600/2000 is a vertical / universal gear hobbing / gear milling machine.
- One listing shows:
• Max wheel diameter: 2,600 mm
• Gear width: 470 mm
• Max module: 25 mm
• Rim width (max): 240 mm
• Internal diameter minimum: 630 mm
• Tool diameter: 420 mm
• X-axis travel: ~ 875 mm; Y-axis ~ 1,000 mm
• Spindle (milling) speed infinitely variable: 18–180 rpm
• Control: Siemens Sinumerik 840 C on some units
• Power requirement: ~ 100 kW
• Machine weight: ~ 38.6 tonnes - Another listing (Makina.ist) states:
• Max module 20 mm
• Max diameter 2,300 mm
• X / Y / Z = 1,135 / 300 / 1,100 mm
• Swivel / tilt angles for milling head: +A / –A = +45° / –90°
• Machine dimensions ~ 7,060 × 4,885 × 4,850 mm; weight ~ 26,500 kg - Asset-Trade listing shows a ~1995 unit:
• X = 1,135 mm, Y = 300 mm, Z = 1,100 mm
• Control: Bosch CC220
• Turning / milling / hobbing functions, internal & external gear work
Given variation between units / years, don’t assume every specification holds exactly; but these are good reference ranges.
Evaluation / Inspection Framework
Use the following multi-phase approach. Bring along precision measurement tools, and ideally a gear specialist or someone familiar with gear-hobbing machinery.
Phase 1: Pre-Screening / Remote Checks
Before you travel, ask for:
- Machine nameplate photos (mechanical & electrical) including serial, model, build year
- Complete specification sheet / original drawings / brochures
- Control system brand, version, software, and backup of parameters
- Operating history: cutting hours vs idle hours, what types of gears / modules were run
- Maintenance / service logs (spindle rebuilds, slide repairs, motor replacements)
- Any retrofits, upgrades, or modifications (e.g. control upgrades, spindle changes)
- Photos / videos in operation (milling head movement, hob motion, axis travel)
- Included tooling / accessories / spares (hob cutters, measuring heads, fixturing)
- Reason for sale
- Shop conditions (coolant type, environment, dust, vibration)
- Layout / footprint / rigging plan
If the seller cannot provide accurate documentation or avoids answering detailed questions, treat as a warning sign.
Phase 2: Structural & Mechanical Inspection (On Site)
Once on the floor, work from outside in:
Structural / Frame
- Inspect frame, castings, column, base for cracks, repairs, welds, distortion
- Check leveling, base anchoring, shimming, settling signs
- Examine guideways, slides, ways: look for wear, pitting, scoring, corrosion
- Inspect way covers, guards, bellows—are they intact, properly mounted?
- Inspect the milling/hobbing head, its swivel / pivoting mechanisms
- Check spindle housing, arbor mounting, bearing supports
- Inspect fixture mounting surfaces, workpiece support structures
- Check for signs of oil, coolant, or lubricant leaks around moving parts
Move parts manually or via slow jogs (if safe) to feel for binding, tight spots, bumps.
Phase 3: Kinematics / Axis Tests & Backlash
- Jog / move axes (X, Y, Z, swivel / tilt) through full travel; feel for smoothness or irregular motion
- Use a dial indicator or test gauge to measure backlash / lost motion in each axis at multiple positions
- Move near extremes and reverse direction to check for hysteresis
- Inspect ballscrews / leadscrews / nuts / couplings for looseness / wear
- If the machine has a swivel or tilt head (for angled milling), check that pivoting axis for backlash or stiffness
- Check that the tool spindle / arbor movement is smooth and free of play
Phase 4: Spindle / Tooling / Cutting Head
- Run the milling/hobbing spindle at variable RPM; listen for bearing noises, vibration, vibration resonances
- Measure spindle arbor runout (e.g. with test bar + indicator)
- Test acceleration / deceleration response
- Inspect tool mounting surface, arbor interface (taper, clamping) for damage or wear
- If the machine supports internal gear milling, test that head’s alignment, rotation, and stability
Phase 5: Control, Electrical & Electronics
- Open the electrical / control cabinets; inspect wiring, connectors, terminal blocks, power electronics
- Look for signs of overheating (discolored insulation, burnt terminals)
- Inspect CNC control modules, inverter / drive modules, interface boards
- Check cable routing, shielding, strain reliefs
- Power up the control panel, test all buttons, switches, interlocks, emergency stop circuits
- Navigate control menus, check parameter integrity, alarm logs, backup status
- Test safety interlocks, limit switches, door/guard circuits
- Check grounding, noise suppression circuits, power stability
Phase 6: Live Testing / Operational Trials
If the seller allows, this is one of the most crucial checks:
- Do a dry (no-cut) test run along a complex gear path to verify synchronization of axes
- Run a test cut / gear hob / milling operation using a known gear blank to evaluate accuracy, surface finish, chatter
- Run the machine continuously under moderate load for 30–60 minutes, then re-check critical dimensions (backlash, alignment) to detect drift
- After warm-up, re-measure backlash, alignment, repeatability
- Cycle swiveling / tilting head movement if applicable
- Repeatedly index tool changes or head pivots (if the machine has them) to test reliability
- Test feed rates, traverse speeds, particularly in regions near machine limits
Watch for thermal drift, vibrations, reverberations, control errors mid-run.
Phase 7: Metrology & Precision Verification
Because gear hobbing demands high precision, bring or demand these measurements:
- Use gauge blocks, master gears, or test artifacts to measure accuracy of gear profiles
- Check repeatability: go to reference point, retract, return, measure deviation
- Check straightness, squareness, alignment of axes
- Inspect concentricity / run-out of cut gear blanks
- After long operation, re-check offsets, tool alignment, drift
- Compare your measured tolerances against your gear quality requirements and what the original specifications claim
Phase 8: Infrastructure, Installation & Practical Considerations
- Confirm the machine’s footprint, weight, required foundation strength
- Ensure crane / rigging / shop access can handle the machine’s dimensions and weight
- Confirm your shop’s power supply (voltage, phase, current) is suitable
- Check coolant / lubrication systems, chip handling, filtration, ventilation
- Ensure space for electrical cabinets, maintenance access, servicing on all sides
- Evaluate spare parts availability (Gleason / Pfauter components, drives, control modules, spindle parts)
Phase 9: Post-Inspection Analysis & Decision
Once all data is in, evaluate:
- Specs vs claims: Does the machine deliver what the seller claimed (travel ranges, module, max gear diameter)?
- Mechanical condition: How much wear on ways, screws, spindles, bearings?
- Spindle & tool head health: Any whine, vibration, unstable behavior?
- Control / electronics integrity: Are modules in good shape or suspect?
- Operational test results: Did the machine produce accurate gears, with stability over time?
- Drift & thermal stability: Did dimensions shift over run time?
- Refurb / repair cost: Estimate costs for replacing spindle bearings, realigning axes, replacing modules, rewiring
- Parts & support availability: Can you get key components (motors, drives, control boards, spindle parts)?
- Warranty / guarantee possibilities: Try to negotiate performance guarantee or return rights based on test-cut results
- Negotiation leverage: Use any misalignments, defects, or non-conformities to push price down or demand spare parts
If too many serious defects exist (e.g. major spindle issues, unrepairable structural damage, missing critical modules), walking away or demanding steep discount is reasonable.