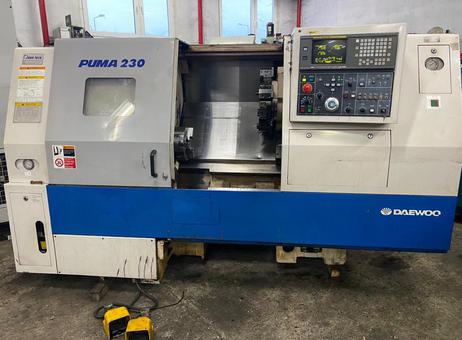
What Industry Experts Recommend Before Purchasing a Pre-Owned, Second-Hand, Surplus, Used Daewoo Puma 230C CNC Lathe made in South Korea
Context & Baseline Specs (for Reference)
To know what “should” be acceptable, it helps to know typical specifications of the Puma 230 / 230C models. Some example published specs:
- The Puma 230C is often listed with a 20″ swing, ~21″ centers, ~3″ bar capacity, 12-station turret, 3,500 RPM spindle, Fanuc 21iT control, etc.
- One listing for a 2002 Puma 230C shows: bar capacity 3″, center distance 21.57″, 10″ chuck, Fanuc 21iT, 3,500 RPM spindle, tool bar detection, coolant / chip conveyor, manual set, etc.
- Another source (Makinate) lists: turning diameter ~250 mm, turning length ~530 mm, turret 12 positions, etc.
Use these as rough checks — if a machine is claimed to be a “Puma 230C” but its specs are wildly different (e.g. 6,000 RPM spindle, or 15 mm bar capacity), that’s a red flag or mislabeling.
What Experts Recommend You Check — Step by Step
Below is a staged approach (pre-visit / visual / functional / metrology / contractual) you or your technical team should follow. Where possible, bring gauges, indicators, vibration sensors, etc.
1. Pre-Visit / Screening Phase
Before you go on site, filter out likely bad candidates:
- Request documentation up front
Ask for service / maintenance logs, repair history, rebuilds, alignment / calibration certificates, original drawings/manuals, spare parts lists, and control / parameter backups. - Get videos and photos
Ask for high-resolution images / video of the machine running (spindle idle, axis jogging) from multiple angles (bed, ways, turret, tooling area). This often reveals condition, leaks, misalignment, or odd behavior you should see in advance. - Check serial number and machine identity
Ask the seller the serial number / build year. If possible, contact Daewoo/Doosan or a parts supplier to confirm whether that serial number corresponds to the claimed model. That helps avoid mis-labeling or “Franken-machines.” - Spare parts / support check
Verify whether replacement parts are still available (spindles, bearings, turret modules, linear guides, ballscrews, servos, encoders). Also check whether local service providers exist who know Daewoo/Doosan lathes.
If parts are rare or expensive, factor in that risk. - Verify the machine’s suitability
Check whether the candidate machine’s spindle speed, torque, turret capacity, travel, chuck size, throughput, axes spec match your intended parts and cycle regime. A machine in poor mechanical condition but “strong enough on paper” may still be unsuitable.
If the seller can’t or won’t provide clean documentation / video / allow inspection, treat that as a red flag.
2. Exterior & Visual / Mechanical Inspection (Before Powering Up)
At the site, before powering, inspect the machine thoroughly.
Frame, Base & Structural Integrity
- Check for cracks, weld repairs, or patches on the bed, columns, headstock, saddle, carriage, and base.
- Look for distortions, deflection, sag, or evidence of heavy shock / impact damage.
- Inspect anchor bolt holes or mounting points — signs of relocation or loosening.
Ways, Slide Surfaces & Guide Systems
- Inspect the bed ways, saddle, cross-slide, and carriage ways for wear, pitting, scoring, corrosion, or rust.
- Check that the scraped / ground surfaces are still intact; heavy polishing or worn “V” surfaces may indicate excessive past wear.
- Look for mis-matched repairs or filler (e.g. epoxy, weld) on ways — which is a red flag.
- Check gibs (if present) for condition and adjustment.
Ballscrews / Lead Screws / Nuts
- Inspect the screws in the X and Z axes (if equipped), their nuts and couplings, for wear, backlash, or backlash compensation parts.
- Check the ends of screws for play, damage, or non-factory repair.
- Verify that the coupling alignment is clean and not loose / sloppy.
Headstock & Spindle
- Check the spindle taper and nose area for damage, corrosion, wear, dents, fretting marks.
- Inspect the headstock housing, bearings (as visible), oil seals, lubricators, and casing surfaces.
- Look for signs of overheating or discoloration near bearing housings or the headstock body.
Turret and Tooling Area
- Inspect the turret indexing mechanism — look for wear, slop, cracks, damage at interface, turret ring condition.
- Check turret drive mechanisms (hydraulic, pneumatic, servo) and indexing accuracy.
- Inspect tooling holders, tools, clamping surfaces, interface geometries for damage, mismatches or wear.
- Ensure turret motors, feedback sensors, and turret control cables are intact.
Tailstock & Quill (if present)
- Check tailstock quill for smooth motion, wear, alignment, lubrication.
- Inspect locking mechanism, quill taper, and guide surfaces.
- Check any tailstock drive (if motorized or hydraulic) and its lines for leaks or damage.
Coolant, Chip Handling & Lubrication
- Inspect coolant tank(s), pumps, plumbing, filters, lines, hoses for leaks, corrosion, cleanliness, bypasses, blockages.
- Check chip conveyor, chip removal system, guards, trays, covers — are they intact and usable?
- Inspect lubrication / automatic lubrication system: oil lines, distribution, greasers, valves, filters.
- Look for plugged lines, missing fittings, or signs of bypassed lubrication.
Wiring, Cable Chains, Electrical Cabinets (Pre-Power)
- Examine wiring harnesses (especially around moving parts) for wear, cracks, abrasion, brittle insulation, patched repairs or non-factory splices.
- Check cable chains / drag chains: are they intact, not deformed, no broken links, proper support.
- Inspect cabinet doors, wiring junctions, connectors, terminal blocks, and general cleanliness of the electrical enclosure(s).
- Look for signs of water ingress, coolant splash inside cabinets, corrosion, dust build-up, insect nests.
Guards, Covers & Safety Features
- Ensure way covers, splash guards, doors, interlocks, safety covers are present and in decent condition.
- Missing or badly damaged guards often signal neglect.
- Check that any doors, covers, slides open and close properly, without binding.
3. Power-Up & Functional / Motion Testing (Light, No Load)
Proceed only if the power environment is safe and the machine control allows (and safety gear is in place). Monitor electrical parameters, listen carefully, use vibration sensors, etc.
Control Initialization & Diagnostics
- Power the machine carefully; monitor inrush current, voltage stability, and check for warnings, alarms or error messages in the control system.
- View machine diagnostics, fault logs, runtime hours, and error histories.
- Test limit switches, home / reference sensors, interlocks, emergency stops — ensure they behave correctly.
- Jog in manual / inch mode with slow feed on axes (X and Z) to confirm the control / axes respond.
Axis Motion Tests (X, Z)
- Move each axis slowly over its full travel, forward and reverse, and observe for smoothness, binding, stick-slip, or notches.
- Reverse direction and check for backlash or hysteresis — measure or feel if there is slop.
- Do multiple passes to check consistency (return to zero, drift).
- Listen for unusual noises (clicking, friction, scraping) during motion.
Spindle Run-Up Test (No Load)
- Run the spindle through its full RPM range; accelerate and decelerate slowly, then at standard ramp speeds.
- Listen for bearing hum, vibration, noise, or instability at various speeds.
- Monitor spindle temperature (if possible) and look for unusual heating.
- Check for smoothness, no wobble, no vibration bursts. Use vibration sensor or accelerometer if possible.
- Stop abruptly (if safe) to test braking (if the lathe has a spindle brake).
Turret Indexing & Tool Change
- Command multiple tool changes; watch the turret index accuracy, speed, positioning, and tool clamping consistency.
- Check that tool changes happen cleanly, without binding, and that tools seat properly.
- Return turret to home several times and confirm repeatability.
Coolant / Pump / Spindle Oil System
- Activate coolant pump, measure flow, pressure, and check for leaks, blockages, cavitation, or weird behavior.
- Check spindle lubrication (oil pressure, feed, alarms).
- Monitor how coolant reaches the cutting area (nozzles, hoses, direction) and inspect for clogs.
“Dry / Soft” Test Cut (If Possible)
- If the seller allows and you have a soft / non-critical material (e.g. mild aluminum or soft steel), run a light test cut (low depth, feed) to feel how the machine behaves under light load.
- Monitor for chatter, stability, vibration, surface finish.
- After stopping and re-starting, check whether the position returns to same reference points or if drift occurs.
Thermal / Warm-Up Drift Test
- Let the machine run idle or light motion for a while (30–60 min) to allow thermal expansion and warming.
- Re-check critical dimensions or positions (e.g. home return, zero positions, turret indexing) to see if drift or shift occurs.
Safety / Crash & Limit Test
- Trigger or simulate limit overtravel conditions, ensuring that the machine stops / faults gracefully without mechanical damage.
- Test emergency stop functionality, safety interlocks, door switches, etc.
4. Metrology, Accuracy & Alignment Validation
Because your production tolerances depend on this, you must verify actual accuracy, repeatability, and alignment.
- Baseline alignment & geometry checks
Use dial indicators, test bars, reference squares, granite surfaces, or laser-based measurement tools to check:
• Spindle axis alignment (runout, tilt)
• Turret alignment, perpendicularity to spindle
• Saddle / bed straightness and flatness along travel
• Carriage / cross slide alignment and backlash
• Parallelism of carriage movements relative to spindle axis
- Repeatability & positional accuracy
Cycle to a position repeatedly and measure deviation.
Move to several offsets and return; check drift, hysteresis, backlash.
Measure how close the machine returns to reference point after multiple moves. - Test part verification
Grind / cut a known-dimension blank or test bar (if possible) and measure the result for diameter, cylindricity, surface finish, concentricity, etc.
Compare to expected tolerances. - Drift under load
Under a moderate cut, observe whether any deflection, drift, or positional change occurs mid-cycle and then measure after cycle to see whether offsets have shifted. - Cross-check seller’s alignment/certification
If the seller offers alignment or calibration reports, compare your own measurements. If there are large discrepancies, question the reliability of their reports. - Error mapping / compensation capability
Check whether the machine’s control allows input or compensation of errors (backlash compensation, scaling error, thermal compensation).
See whether those compensation features are intact and accessible.
If the machine cannot be corrected to meet your required tolerances (within a repair cost you would accept), its value diminishes drastically.
5. Electrical, Control & Software Evaluation
The control system (CNC, servo drives, feedback loops) is as critical as the mechanical parts. Many used machines fail here.
- Electrical cabinet & component condition
Look inside control cabinets for dust, debris, coolant ingress, corrosion, discoloration, burnt wiring, signs of rework.
Verify power supply, fans, filters, ventilation, strain reliefs are intact and working. - Servo drives, amplifiers, motors
Check for drive/amp fault history, error logs, communications errors.
Power up each axis and monitor current draw, stability, and responsiveness.
Look for any drives in error or disabled status. - Encoders / feedback & scale systems
Verify encoder cables, shielding, connectors, signal continuity.
Check whether feedback signals are stable under motion (if you have diagnostic access).
Ensure that scale or encoder compensations are properly configured. - CNC control, HMI, software, parameter interface
Confirm that the controller is functional, menus accessible, parameters editable, memory backup available.
Check that all operators’ pages, overrides, M-codes, macro features, and customization are working.
Try uploading / downloading NC programs, inspect redundancy, verify program memory integrity.
Look for “custom hacks” or non-standard modifications added by prior users. - Network / connectivity / support interfaces
If the control supports DNC / Ethernet / remote diagnostics, check whether those functions are alive.
Ask for backups, firmware versions, memory modules, license keys (if needed).
Check whether the controller or drive modules are obsolete or nearing end-of-service status (in which case replacement modules may be hard or expensive to source). - Interlocks, safety, fault detection
Test safety circuits, e-stop functions, door interlocks, overtravel protection.
Check any built-in thermal, vibration, or overload protection systems (if present) for operation. - Wiring, cable routing & drag chains
Check all wiring runs, especially along moving components. Look for wear spots, brittle insulation, loose or patch repairs.
Inspect drag chains or cable carriers — ensure they are not broken, jammed, or misaligned.
If the control is partially defective or has missing modules, repairing it may be prohibitively expensive compared to acquisition cost, so identify these risks early.
6. Logistics, Disassembly, Installation & Commissioning
Even the perfect machine can fail to perform if the logistics and re-installation are mishandled. Ensure you plan for:
- Safe disassembly & lifting
Check that lifting eyes, tie points, structural brackets are intact and rated.
Assess whether heavy components (headstock, turret, bed, etc.) can be removed or shipped safely. - Transportation risk & packaging
Plan for shock absorption, anti-vibration packing, securing of moving parts, bracing of turret and slides.
Insure the machine during transport, including partial damage. - Foundation, floor & anchoring
Confirm your target facility’s floor strength, anchoring scheme, vibration isolation, leveling requirements.
Leveling / shimming must be precise — any misalignment can degrade performance. - Electrical, utility and environment readiness
Ensure proper power supply (voltage, phase, grounding), cooling, compressed air, chip removal, exhaust / ventilation.
Ensure your workshop environment (temperature, humidity) is acceptable for achieving accuracy. - Final alignment, calibration & warm-up
Plan for time for alignment, calibration, thermal stabilization, compensation settings, and test runs.
Bring your metrology tools, reference pieces, and technicians. - Acceptance / test-cut commissioning
Before final acceptance, run representative parts (under full load, full cycle) and verify that tolerances, surface finish, cycle times, and repeatability meet your production requirements. - Spare parts ready
Bring or order critical spare parts in advance (bearings, belts, sensors, fuses, coupling elements) to avoid downtime later. - Insurance & liability clauses
Ensure the machine is insured during transit and reassembly.
Define liability for damage until final acceptance. - Schedule buffer / contingency time
Expect that things may go wrong — plan extra time for adjustments, minor repairs, calibration, or troubleshooting.
7. Contractual Safeguards & Purchase Terms
To protect your investment, negotiate the purchase agreement with strong safeguards:
- “Inspection & acceptance” clause
Make your purchase contingent on a final, on-site inspection, functional testing, and alignment verification by your engineers or a third party.
Reserve right to reject the machine or renegotiate if results are unsatisfactory. - Performance / test-cut guarantee
Require the seller to allow or perform test runs (with your tooling or dummy workpieces) under load, with agreed tolerances and repeatability.
Define clear acceptance criteria (e.g. diameter tolerance, surface finish, cycle stability, stability over multiple repeats).
If criteria are not met, you can refuse or recover funds. - Limited warranty / liability period
Negotiate a warranty (e.g. 90 days, 6 months) on critical subsystems (spindle, turret, slides, control).
Define liability for latent defects discovered later. - Inclusion of spare parts, manuals, tooling
Require transfer of all available manuals, parts lists, wiring diagrams, backups, tooling sets, etc.
Ask the seller to include critical spare parts (bearings, seals, sensors, couplings) as part of the sale. - Payment tied to milestones / acceptance
Don’t pay full upfront. Hold back a portion of payment until successful delivery, installation, alignment, and performance test are passed. - Transport & damage liability
Clearly define who bears risk during disassembly, shipping, reassembly, until you formally accept the machine.
The seller or transporter should insure against damage in transit. - Title, liens, and ownership clarity
Ensure clean title and that the seller has legal right to transfer the machine, with no liens, encumbrances, or unresolved ownership claims. - Support / training / startup assistance
If possible, contract for a period of startup support, training, or remote/onsite troubleshooting after commissioning. - Disclosure of known defects
Require the seller disclose all known defects, repairs, modifications, crash incidents, or parts replacement history.
Insist that the machine is sold in the condition as inspected, not “as-is” in a way that waives your rights if defects were hidden. - Holdback / escrow of funds
Hold a portion of payment in escrow or as a “holdback” until final acceptance to provide leverage in case issues arise later.
8. Red-Flag Warning Signs (High Risk Indicators)
During your inspection and testing, any of the following should raise alarm and may justify walking away or aggressively discounting:
- Missing, incomplete, or inconsistent service / maintenance logs or repair history.
- Structural cracks, weld repairs, or evidence of frame damage or distortion.
- Severely worn, scored, pitted, or corroded ways, guides, or slide surfaces.
- Excessive play, backlash, slop or sloppy motion in any axis.
- Unusual noises, vibration, or instability during spindle run-up or axis motion.
- Turret indexing errors, tool seating misalignment, or mechanical slop in turret.
- Electrical components with burn marks, non-factory wiring, messy repairs.
- Control or drive modules missing, defective, or obsolete with no replacement path.
- Encoders/sensors or feedback systems failing or with signal issues.
- Coolant or lubrication systems clogged, corroded, leaking, or nonfunctional.
- Smooth-looking cosmetic refurbish (fresh paint) without internal overhaul or mis-match of parts (i.e. cosmetic “masking” of deeper wear).
- Seller refusing full inspection, test cuts, or metrology measurement.
- Machine that requires excessively expensive parts or modules that are out of production.
- Poor or risky logistics (weak lifting points, fragile attachments, arrangement that will make re-install difficult).
If multiple red flags appear, consider walking away or demanding a deep discount plus repair reserve.