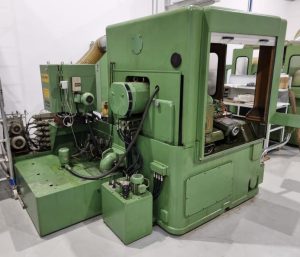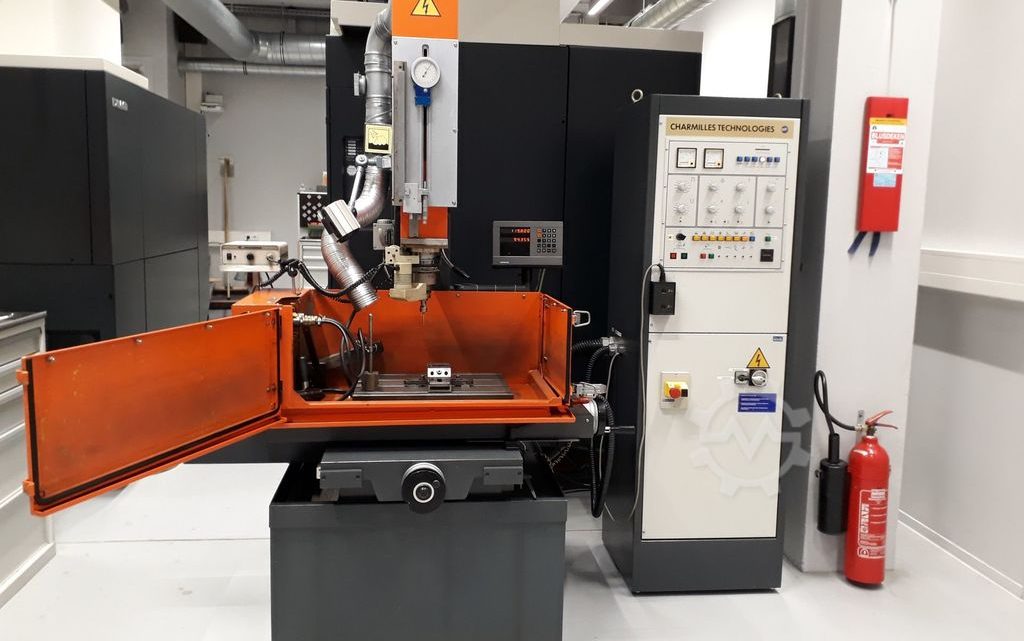
Technical Buyer’s Handbook: Assessing Pre-Owned , Used , Secondhand, Surplus CNC Machines Before Purchase Charmilles Form 2-LC EDM Die Sinking made in Switzerland
Here is a Technical Buyer’s / Due-Diligence Handbook / Inspection Checklist for evaluating a pre-owned / used / surplus Charmilles Form 2-LC die-sinking EDM (Electrical Discharge Machine), presumed “Swiss made / Charmilles origin”.
I also include example specification benchmarks (from used listings) to help you calibrate expectations.
You should tailor tolerances, weighting, and test depth based on your required precision, electrode size, and criticality of the machine in your production.
0. Reference / Benchmark Specifications (Charmilles Form 2-LC)
Before inspection, obtain or verify the exact spec sheet for the unit (serial number). Meanwhile, here are typical values from sales listings:
| Parameter | Typical / Reported Value |
|---|---|
| X-axis travel | ~ 300 mm (12″) |
| Y-axis travel | ~ 200 mm (8″) |
| Z (quill / vertical) stroke / travel | ~ 200 mm (8″) |
| Maximum quill to table (clearance) | ~ 550 mm (≈ 22″) |
| Table dimensions | ~ 500 × 350 mm (≈ 19.5″ × 13.75″) |
| Work tank / dielectric tank | ~ 820 × 500 × 300 mm (32″ × 12″ × 12″) |
| Maximum process current | 50 A in many listings |
| Maximum electrode load | ~ 60 kg (or 132 lbs) in some listings |
| Maximum workpiece weight | Up to ~ 500 kg (or 1,100 lbs in some US listings) |
| Tank / dielectric reservoir capacity | ~ 280 liters (63 gallons) in some reports |
| Physical dimensions / footprint | ~1,200 × 1,300 × 2,300 mm (W × D × H), weight ~1,100 kg in some listings |
Use these as reference to assess how far the candidate machine deviates, and whether the deviations are acceptable or require refurbishment.
I. Pre-Inspection / Remote Phase
Before visiting, try to collect as much information and documentation as possible. This minimizes surprises and helps you prepare.
- Request full technical documentation
- Charmilles / GF manuals: mechanical, electrical, control, dielectric circuits
- Wiring schematics, control logic, I/O maps
- Maintenance / service logs (repairs, module replacements)
- Calibration / alignment certificates, electrode path alignment records
- Modification / retrofit history (e.g. power supply upgrades, control upgrades)
- Spare parts list / BOM - Ask for photos & videos
Request clear, high-resolution images / videos of:
- Machine exterior (frame, covers)
- Table, work tank, dielectric bath, filters
- Electrodes, collet / electrode holders
- Generator / power supply module, wiring cabinet
- Axis motion videos (X, Y, Z) if still operational
- Interior of dielectric tank, filter system, piping - Key diagnostic questions to the seller
- Year of manufacture, serial number
- Total operating hours or usage history
- Whether machine is currently functional / under power
- Known defects, repairs, or incidents (collision, dielectric flooding, arc damage)
- Which major components have been replaced (generator, control board, electrode drives)
- Spare electrodes / collets / fixtures included?
- What control electronics and software version is installed - Plan your inspection tools & instruments
Bring or plan to have:
- Dial indicators, test bars, straight edges
- Micrometers, feeler gauges
- Insulation / dielectric leakage testers
- Current / voltage meters, oscilloscopes
- Flow / pressure gauges for dielectric / flushing circuits
- Thermography / IR camera, vibration sensor
- Clean tools to open covers, inspect internal circuits - Logistics & site assessment
- Machine footprint, crane / hoist access, rigging plan
- Foundation / floor load capacity and flatness
- Electrical supply (voltage, phases, power capacity)
- Dielectric / flush fluid supply, filtration, drain / disposal
- Compressed air or other auxiliary services
II. Visual & Static / Mechanical Inspection (Power-Off)
Once on-site, before powering up, do a detailed physical inspection of structure, mechanics, and subsystem integrity.
2.1 Frame, Base & Structure
- Inspect frame, casting, machine base for cracks, weld repairs, deformation
- Check for signs of stress or distortion, misalignment, repeated repair zones
- Examine enclosure, covers, panels, access doors, guards for condition, alignment, fit
- Inspect the work tank / dielectric tank interior for corrosion, leaks, wear
2.2 Table, Work Tank & Plunge / Z-Axis
- Inspect table surface for wear, flatness, damage
- Check work tank (dielectric bath) walls, liner, level sensors, leakage
- Inspect Z-axis / quill mechanisms: rails, slides, guides for scoring or wear
- Inspect plunge drive, mechanisms of vertical motion (lead screws, motors)
2.3 Electrode Holding, Collets, Head / Spindle Mechanism
- Inspect electrode holders, collets, chucking surfaces for wear, damage, burrs
- Inspect head / spindle (electrode drive) mechanism: bearings, seals, coupling
- Check drive motor, feedback sensors, wiring in electrode head
- Inspect alignment / adjustment mechanisms for electrode axis
2.4 Generator / Power Module & Control Electronics
- Inspect the generator unit (power supply / high-voltage module) for signs of overheating, insulation degradation
- Inspect capacitors, high-voltage cabling, control boards, fans, cooling systems
- Check wiring & connectors for discoloration, loose joints, burned insulation
- Inspect control cabinet: drive boards, control logic, I/O modules
2.5 Dielectric & Filtration System
- Inspect dielectric pump, piping, hoses, valves, filters, cartridges
- Check for leaks, wear or brittleness of dielectric lines
- Inspect filter cartridges, filter housings, sinking or clogging risks
- Check reservoir, supply, return lines, recirculation path
2.6 Safety & Interlocks
- Validate emergency stop (E-stop) buttons and wiring
- Check door interlock switches, cover interlocks, guard sensors
- Inspect limit switches for each axis (X, Y, Z)
- Confirm no bypass circuits or overridden interlocks
III. Power-Up & Functional / Dynamic Testing
With care, power up the machine and perform functional tests. Safety is critical when dealing with high-voltage EDM.
3.1 Initial Power-On & Diagnostics
- Power control logic / electronics (without generator) first, check guide logic, control panel, I/O feedback
- Then enable generator / high-voltage circuits (if safe)
- Observe startup: alarms, error status, self-tests
- Confirm all limit / home / safety inputs are functional
3.2 Axis Jog & Motion Tests
- Jog X, Y, Z axes at low speed; check for smoothness, direction correctness, no binding
- Move axes across full travel (within safe limits) to check mechanical freedom
- Reverse direction moves; check any mechanical backlash or slop
3.3 Homing / Referencing / Return to Zero
- Command homing / reference cycles (if machine supports)
- Repeat homing multiple times; measure consistency of return position
- Check limit / soft-limit behavior
3.4 Generator / Discharge Testing (Low Power / Sim Cycle)
- Run the EDM generator at low (safe) power / current levels; check for stable arc, sparking behavior
- Use a test electrode with dummy workpiece to simulate discharge (if feasible)
- Monitor arc stability, current control, response to parameter changes
- Check cooling / dielectric flushing under discharge conditions
3.5 Dielectric / Filtration / Flow Tests
- Activate dielectric pump / filtration circuits; verify proper flow, pressure stability
- Check flow rates through filters, clean vs dirty conditions
- Test return / overflow paths, refill and fluctuation behavior
3.6 Safety / Fault Handling Tests
- Hit E-stop during axis motion, generator operation: ensure immediate safe stop
- Trigger limit switches or interlocks to verify safe stoppage
- Simulate sensor or feedback failures (if safe) to test error detection
- Test guard door opening during operation: the machine should disable HV output
3.7 Stability / Endurance / Thermal Tests
- Let the machine run idle or in motion for a while to warm up electronics, dielectric, generator
- After warm-up, repeat key motion / positioning tests to detect drift
- Monitor temperatures in control cabinet, generator, pumps
- Use thermal / IR imagery to identify hot spots or abnormal heating
IV. Precision, Repeatability & Calibration Validation
Once the machine is thermally stable, conduct precision tests to see whether it meets acceptable tolerances.
- Repeatability test: move to a point, retract, return, measure variation
- Grid or mesh motion test: command a sequence of electrode positions across X/Y and check positional deviation
- Z-axis consistency under different heights: check electrode plunge / retraction accuracy
- Arc overlay / alignment: verify that electrode path aligns with intended axes under discharge conditions
- Electrode to workpiece gap control consistency under parameter changes
- Arc pulse stability tests: measure fluctuations in current / voltage under various settings
- If available, use precise measuring devices / reference gauges to check offsets / drift
V. Documentation & Service / Repair History Review
After mechanical and dynamic tests, carefully review documentation and history.
- Maintenance / repair logs: generator rebuilds, control replacements, electrode motor overhauls
- Calibration / alignment records (positioning / electrode path)
- Retrofits / upgrades (control, generator, filter system)
- Control program / software version history
- Spare parts included (electrodes, collets, filters, control modules)
- Tooling or electrode stock included
VI. Risk Assessment, Life-Remaining Forecast & Cost Estimation
Based on your testing and inspection, build a risk model and cost forecast.
- Wear-prone components: electrode drive motors & bearings, guides, control electronics, filter cartridges, pump systems
- Spare parts support / availability: for Charmilles / GF / EDM manufacturer components
- Generator / HV component obsolescence / risk
- Control electronics age / obsolescence
- Calibration / re-alignment cost after moving
- Transport risk (shock to generator, high-voltage circuits)
- Commissioning and downtime until fully functional
- Fallback / salvage value: structural frame, tank, mechanical axes
You may build a weighted scoring matrix (axes, generator, control, dielectric, safety) to quantify condition and guide negotiation.
VII. Contractual Safeguards & Negotiation Levers
Use your findings to insert protective contract clauses:
- Acceptance / performance testing clause: require the machine to pass your functional and precision tests at your site
- Price adjustment clause: allow deduction if key metrics (positioning, arc stability) deviate beyond agreed thresholds
- Warranty / latent defect clause: e.g. 3–6 months covering high-voltage / generator defects
- Spare parts / consumables package: filters, electrode holders, collets, fuses, modules included
- Documentation handover clause: full manuals, circuit diagrams, program backups, calibration data
- Transport / insurance clause: clearly specify who bears risk of damage to HV components or generator during shipment
- Commissioning / support clause: seller or their service must assist calibration / startup
VIII. Post-Purchase / Installation & Commissioning Checklist
Once the machine is delivered and installed in your shop:
- Level and anchor the machine foundation rigidly
- Check cabling, grounding, dielectric plumbing, filtration lines
- Clean and test dielectric circuits, fill tank, prime pumps
- Power up and re-run all acceptance, dynamic, and precision tests
- Perform full calibration and alignment (electrode axis, motion axes)
- Perform test EDM operations on sample electrodes / blanks; validate spark stability, dimensional accuracy
- Capture baseline performance metrics: repeatability, drift, pulse stability
- Train operators / repair / maintenance staff in high-voltage safety, dielectric handling, generator handling
- Establish preventive maintenance schedule (filter changes, pump service, generator checks)
- Monitor performance (drift, electrode wear, anomalies) especially in early operation