Smart Buyer’s Guide: How to Choose the Right Pre-Owned, Used, Secondhand, Surplus CNC Equipment Before Purchasing Atrump SPACE SAVER S8 NC Vertical Machining Center made in USA
Below is a Smart Buyer’s Guide tailored for purchasing a used (pre-owned / surplus) Atrump SPACE SAVER S8 (or equivalent small vertical machining center). It draws on general CNC-used-machine principles and the specific known specs and features of the the Atrump S8. Use this as a checklist and decision framework when inspecting, negotiating, and commissioning.
0. Know What the Atrump S8 Is, and What the “Ideal” Baseline Specs Are
Before evaluating a used unit, you should be very familiar with what a “good” S8 should offer (so you can spot deviations or compromises).
From Atrump’s published data:
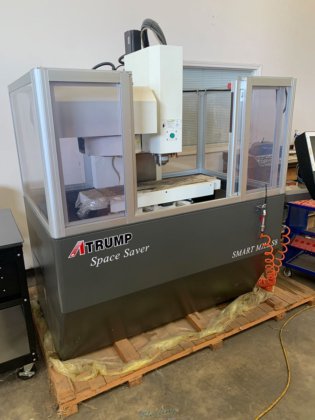
- The S-8 / Space Saver / Smart Mill S8 is a compact 3-axis vertical machining center.
- Key published specs include:
• Travels: X = 15.37 in (≈ 390.4 mm), Y = 9.45 in (≈ 240 mm), Z = 13.75 in (≈ 349.3 mm)
• Spindle: BT30 taper, 8,000 rpm max
• Spindle power / motor: Often 2 HP (max)
• Tool changer: 8-tool armless ATC (no rotating carousel, simpler mechanism)
• Structure: Meehanite or FC30 castings, stress-relieved, linear guideways on all axes, telescopic way covers, central lubrication.
• Controller: Centroid M400i (15″ LCD) in many configurations
• Footprint & weight: ~ 74″ × 48″ × 79″ (l × w × h), weight ≈ 2,640 lbs (≈ 1,200 kg)
• Load capacity: ~ 220 lbs (~100 kg) on table
Because of its compact size, the S8 is often marketed for “office / job shop” use. That means wear, precision, and maintenance history will matter heavily, given its relatively low power/rigidity envelope compared to larger machines.
Whenever you inspect a candidate unit, compare how closely it aligns with these baseline specs. Deviations can be acceptable, but you must understand them (e.g. if spindle was upgraded or derated, or if the ATC was swapped or removed).
1. Define Your Requirements & Use Case
Before visiting any candidate machine, clarify exactly what tasks you plan to run, what tolerances you need, and how often you’ll use it. Some guiding questions:
- What is the maximum workpiece size / envelope you need in X, Y, Z? Will the S8’s 15.4 × 9.45 × 13.75 inch travel suffice with margin for fixtures, clamps, etc.?
- What material types and removal rates will you run (aluminum, steel, titanium, plastics)? Will a 2 HP (or whatever the candidate’s spindle) be strong enough?
- What tolerances (positional, repeatability) do your parts demand?
- How many tools will your jobs use? (If 8 tools is insufficient, you may need to see if a larger ATC or tool rack is fitted).
- What control / CAM compatibility do you need (e.g. G-code dialects, macros, probing, coordinate rotation)?
- What is your shop’s infrastructure: floor loading, power supply (voltage, phases), coolant, chip removal, space for maintenance access, temperature stability?
Having these requirements in hand will allow you to screen out machines that cannot meet your real production needs, regardless of price or appearance.
2. Pre-Screening / Remote Inquiry Before Visiting
Before physically visiting, you can filter out bad candidates by asking the seller the following (and requiring photographic / video proof):
- Full model, serial number, and year of manufacture (so you can check typical reliability, spare-parts availability, control version).
- Has the ATC (tool changer) ever been removed, repaired, or replaced?
- Total running hours (if logged) or accumulated use. Distinguish between “power-on hours” and “cutting hours” (cutting hours reflect actual load).
- Maintenance and repair history: spindle rebuilds, ball screw replacements, drive / servo replacements, way repairs, control board replacements.
- Any crashes, collisions, or major repairs (especially in head, column, ways).
- Is the control & software package / backups / manuals available? Are there configuration files, backup of parameters, wiring diagrams?
- Are there error / alarm logs in the controller? Are there recurring faults?
- Are there visible damages in photographic evidence: way covers torn, rust, oil leaks, missing covers, electrical cabinet damage, broken machine guards.
- Ask for a video demo: move each axis, tool change cycle, spindle run (across speeds) — ideally under near-load conditions.
- Ask about retrofit or upgrades: e.g. has the spindle been upgraded / replaced? Has the control been changed (e.g. customized or hacked)?
- Ask about spare parts availability for that specific S8 unit (especially ATC parts, belts, control modules, etc).
If they fail to provide credible answers, documentation, or video, that is a red flag.
3. On-Site Inspection / Technical Checklist
When you physically inspect a machine, bring (or hire) a technical person or metrology / CNC service engineer. Here is a structured checklist you should walk through.
A. Structural, Mechanical & Wear Inspection
- Frame, casting, welds, and structural rigidity
Check for cracks, repairs, welds, deformations, corrosion or voids in cast surfaces (especially base, column, head). - Guideways / rails / ways & way covers
Inspect linear guide rails (or whatever guide system) for wear, scratches, pitting, brown discoloration. Check whether way covers (telescopic or bellows) are intact and undamaged. - Ball screws / nuts / backlash
Jog each axis and feel for backlash, “slop,” or unevenness. In several positions, reverse direction and see how much difference there is. - Head / spindle alignment
On verticals, the head can lean in Y or twist as wear sets in. Use a test bar or indicator to check for head drift / Y-axis sag / tilt. - Tool changer / ATC mechanism
Since the S8 uses an 8-tool armless ATC, inspect the gripper arms, drawbars, selector mechanisms, and tool seating surfaces for wear or damage. Run multiple tool changes and watch for hesitation or misalignment. - Spindle nose / taper / runout
With a test bar or indicator, check spindle runout at different rpm ranges. Visually inspect spindle nose / taper for wear or damage. - Spindle bearings / noise / vibration
Run the spindle at slow, medium, and high rpm. Listen for bearing hum, growl, or unusual noise. After extended running, feel for excessive heat or vibration. - Electrical cabinet, wiring, cables & panels
Open cabinets, inspect wiring looms, terminal blocks, signs of overheating, burnt insulation, dust, rodents, moisture. Check whether cables / connectors are OEM or have been replaced. - Control panel, operator interface, and buttons / switches
Check all buttons, switches, E-stop, lights, switches for responsiveness, match labeling, evidence of replacement or user modifications. - Cover / guards / enclosure
Inspect whether doors, windows, guards are present, properly latching, and undamaged. - Lubrication / coolant / hydraulic / pneumatic systems
Inspect coolant tank condition, pumps, piping, valves, cleanliness. Check lubrication lines, automatic oilers, greasing systems. - Foundation / leveling points
Examine the machine’s leveling feet, base anchor points, and mounting footprint. If the machine has been moved or reinstalled multiple times, the base may have stresses or misalignment.
B. Functional / Operational Checks
If possible, power up and run a suite of tests:
- Axis motion & homing / referencing test
Move each axis through full travel in both directions, at different speeds (fast traverse, moderate, slow), watching for smoothness, stutters, hesitations, uneven acceleration, stick/slip.
Execute homing / referencing cycles and check that limit switches, home switches, etc. function properly. - Backlash / repeatability test
Pick a modest move (e.g. 50 mm or 2″) and command back-and-forth, measuring final position with an indicator or test bar to see deviation. - Ping test / probing test (if equipped)
If there is a probe / tool touch off / probing system, test its repeatability and consistency. - Tool change cycles
Run multiple successive tool changes (e.g. 10–20 cycles) to see reliability, speed, consistency, and whether misalignments occur. - Run a test program or light cut
If the seller is willing, run a light cutting job (e.g. soft aluminum) with a toolpath that includes acceleration, feedrate changes, curves. Observe vibrations, chatter, thermal behavior, and whether the machine behaves stably. - Check alarm / event logs
Ask to review machine’s error history. Look for repeated faults, axis limits, over travel, servo faults, spindle faults, etc. - Thermal stability / drift checks
If possible, let the machine stabilize for 30–60 minutes under idle state, then re-check critical dimensions (with gauge / test bar) to see how geometry drifts as temperature changes.
C. Metrology & Accuracy Checks (if you bring metrology gear or a lab)
- Use precision test bars, gage blocks, or a laser interferometer to measure straightness, pitch, yaw, linear accuracy over axes, geometric squareness.
- Check flatness of the table, alignment of axes, deviation over travel ranges.
- Measure backlash / repeatability quantitatively.
- Measure spindle runout at different overhang lengths.
- If possible, check volumetric accuracy (for more complex parts) to see how errors stack.
D. Documentation & Support Assets
- Ensure manuals, operation & maintenance guides, wiring diagrams, parts lists, controller parameter documents, PLC code, configuration backups are included or can be obtained.
- Confirm whether the original software / controller licenses are intact (and not disabled).
- Check whether the original spare parts kits or some replacement modules are included (especially consumables like belts, seals, sensors).
- Ask for any available service / repair invoices, maintenance logs, part replacement history, and usage logs.
4. Evaluate Wear, Depreciation & Remaining Value
Because used machines age and degrade, your job is to estimate how much life is left and what repairs might be needed. For a machine like the S8, critical wear items can quickly become expensive.
Consider:
- Spindle health & remaining bearing life
Bearing replacement is expensive. If spindle shows noise or questionable runout, budget for a rebuild or replacement. - Ball screws / nuts / backlash compensation
Excessive backlash or worn nuts may require regrinding or nut replacement. - Guideway wear or rail replacement
Worn rails or guides, scrapped bearings, or costly rebuilds. - Electrical / control module obsolescence
Older control cards, drives, DC modules, motors, or parts might be hard to source or expensive. - Structural distortion or alignment drift
Reworking structure, re-alignment, re-scraping surfaces may be needed. - Auxiliary systems (coolant, lubrication, ATC)
Pumps, tanks, lines, valves, tool changer wear may need overhaul.
When obtaining price quotes / negotiating, you should discount the offer based on anticipated refurbishment costs. For example, if you estimate $3,000 for a spindle redo, $1,500 for tool changer servicing, $1,000 for control module spares, etc., subtract that from your max offer. It is safer to assume “worst reasonable” scenario.
Also consider the cost and availability of replacement parts (for the S8 model, ATC spare parts, control modules, belts, etc.). If parts are rare or must be custom-ordered, that is a risk to your operations.
5. Logistics, Installation & Commissioning Costs
Do not underestimate the “hidden” expenses involved in bringing a used machine into your facility and making it production-ready.
- Transportation & rigging
Even though the S8 is moderate in size (≈ 1,200 kg), relocating, crating, shipping, loading/unloading, leveling and repositioning demand qualified riggers and possibly lifting gear. - Foundation / floor / base requirements
The floor must support the weight and dynamic loads, possibly requiring foundation pads, leveling grouting, anchor bolts, vibration damping. - Power & utilities
Make sure your shop has the proper voltage, phase, current, stable electrical service. The S8 is typically in the 208–230 V, 3-phase domain in many configurations.
Also coolant system, chip handling, drain, air lines, vacuum / mist removal, etc. - Initial alignment, calibration & verification
After installation, you’ll likely need alignment of axes, leveling, tramming of head, compensation maps, test cutting, fine-tuning, thermal stabilization. - Operator training & startup tuning
Your staff will need time to get used to the control, manual parameters, tool change quirks, and idiosyncrasies of this specific S8. - Spare parts, tooling, consumables
Budget for spares (belts, seals, sensors, switches, fuses, modules, ATC spares) and a toolkit for maintenance. - Warranty, acceptance period, and commissioning support
If buying from a dealer or refurbisher, try to negotiate a short warranty period (e.g. 30 to 90 days) or acceptance testing period.
Because these costs often run 10–20% (or more) of the machine purchase cost, factor them in before finalizing the deal.
6. Price Negotiation & Valuation Strategy
To arrive at a fair offer or “walk-away” price, use the following approach:
- Benchmark market prices
Research what similar Atrump S8 units (same year, similar wear, same controller) are being offered globally (used equipment marketplaces, auctions, dealer listings). I found one listing: Atrump Space Saver S8, 2013, 8 ATC, 15.37″ × 9.45″ × 13.75″, 8,000 rpm, BT30, listed .
Also note new S8 machines list in the ~$30k+ region (depending on features) in some listings.
Use those as reference points. - Adjust for condition and defects
Subtract for wear, missing components (e.g. missing ATC, damaged parts), unknown history, and upgrade needs.
If the spindle, ATC, or control will need refurbishment, subtract those estimates. - Include “risk buffer”
Always leave margin for unforeseen issues after purchase (bad wiring, hidden fatigue, missing parts). - Negotiate inclusion of spares, documentation, or test cuts
Try to secure spare modules, wiring diagrams, OEM manuals, parameter backups, and a short commissioning period as part of the deal. - “Test under load” as condition of sale
Require that the machine be run under a representative load or demo part before final acceptance. - Use a “repair reserve / escrow”
In deals between individuals or companies, sometimes hold back a deposit (or escrow amount) until after installation and acceptance. - Use “walk-away” threshold
Decide in advance your maximum acceptable total cost (including refurbishment) and be ready to walk away if seller isn’t willing to accommodate known issues.
7. Red Flags / “Deal Killers” for an S8 Candidate
If you detect any of the following in a candidate S8, you should demand strong price reductions or avoid the machine entirely:
- Missing or nonfunctional ATC (the S8’s 8-tool mechanism). If it’s removed or inoperative, reinstallation may be too costly.
- Spindle with excessive noise, vibration, or questionable runout.
- Control missing, corrupt, or heavily modified (especially custom hacks of the Centroid M400i).
- No documentation (manuals, wiring, software backups).
- Evidence of severe collisions, structural repair, or cracks in casting.
- Guideway damage that suggests rail replacement or re-machining will be needed.
- Electrical cabinet damage, burnt wires, missing modules.
- Suspiciously low price without clear reason (too good to be true).
- Seller unwilling to allow test cuts or operational demonstration.
- No spare parts support or inability to source replacement modules or ATC parts.
- Hidden costs (shipping from remote location, customs, long downtime, etc.) that erode the value.
As one user summarized in a CNC forum:
“The answer also depends a great deal on who is going to fix it … If I need a $10k specialty tool or electronics interface to reset or diagnose it then the answer is no.”
In other words: even if the machine looks good, if you don’t have a support path for parts and service, it’s a high risk.
8. Post-Purchase Commissioning & Best Practices
Once you have purchased and installed the unit, follow these steps to bring it into stable production:
- Before moving, take reference measurements (if possible) of the unit as found (flatness, alignment) so you can compare post-reinstallation.
- Re-level and align using precision leveling, adjust axes, check square, orthogonality, and tramming of head.
- Run “burn-in” tests: slowly jog axes, run at moderate speed, check vibration, drift, thermal expansion.
- Perform calibration cuts, test parts, measure, and compare to expected tolerances.
- Monitor the machine closely in early weeks for drift, loose bolts, alignment creep.
- Set up a preventive maintenance schedule early: check lubrication, way surfaces, backlash, calibrations, belt tension, and electronic health.
- Keep a maintenance log from day one (repair, calibration, parameter changes).
- If control or modules show signs of instability, consider swapping in better spare parts or upgrades sooner rather than later.