Make the Right Move: Proven Steps to Evaluate a Used, Second-Hand, Surplus, Pre-Owned JD Squared RC-6 Rotary Plasma Tube & Pipe Cutter made in
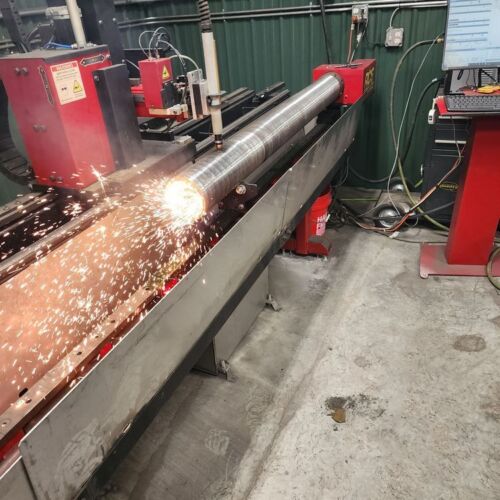
Here’s a specialist’s playbook — “Make the Right Move” — for evaluating a used / second-hand / surplus / pre-owned JD Squared RC-6 Rotary Plasma Tube & Pipe Cutter (manufactured in the USA) before you commit. This will help you avoid costly mistakes and ensure you get a machine that performs.
🔍 1. Understand What the RC-6 Is & What to Expect
First, know the baseline so you can spot discrepancies.
- The JD Squared RC-6 is a rotary plasma tube & pipe cutter designed to cut, route, and mark round tube, square tubing, channel, angle iron, etc.
- It is built in the USA by JD Squared, Inc., a family-owned American manufacturer.
- Key published specs include (for a 12′ version):
• Max OD capacity (with stabilizer): 6″ schedule 40 pipe; Square tubing 4″; Channel & angle iron 4″
• Without tube stabilizer: can handle up to 8″ pipe (at reduced length) and somewhat smaller structural shapes
• Travel dimensions: Y up to 10.5′, X ~12.5″, Z ~7″ for 12′ machine; for 24′ version Y = 22.5′
• Motors: brushless servo motors on all axes
• Machine power requirement: 190–240 VAC, single phase + neutral, 50/60 Hz, around 30A (without router)
These give you your “target spec sheet” to cross-check what the seller claims.
2. Pre-Visit Remote Screening
Before traveling, eliminate bad leads:
- Ask for the exact model, serial number, build year, and full spec sheet.
- Request photos / videos of the axes moving, torch head motion, stabilizer in use, and the control / electronics cabinet.
- Ask for a live demo or remote screen share so you can issue axis commands, watch motion, and check responsiveness.
- Ask for a list of spare or replacement parts that have been used (torches, servo motors, linear guides, electronics).
- Check that the machine is from original JD2 production (i.e. not heavily modified or hybrid) — check branding, build quality, and consistency with JD2’s USA manufacturing claims.
If the seller can’t or won’t provide this, the risk is high — either the machine has issues or the seller lacks confidence.
3. On-Site Inspection & Technical Audit
When you arrive, bring:
- Dial indicators, test bars, micrometers
- Multimeter / electrical test tools
- Laptop (if you might connect to the control)
- Flashlight, inspection mirrors, lens cloth
Here’s your step-by-step inspection:
A. Mechanical & Motion Components
- Frame, Gantry & Rails
- Inspect welds, frame alignment, straightness of rails (X, Y, Z) for wear, sag, or misalignment.
- Use a straightedge or test bar across the length and see for twist or bending.
- Linear guides / bearings / motion slides
- Manually move axes (X, Y, Z) at low speed and feel for binding, rough spots, play, or “dead zones.”
- Check wear on guide rails, look for scratches, pitting, corrosion.
- Inspect lubrication system (grease or oil paths) — were they maintained?
- Servo motors / coupling / gearboxes (if any)
- Visually inspect the motors, cables, connectors.
- Power on axes and run them; listen for noise, vibration, or signs of motor trouble.
- Check backlash / backlash compensation: move forward/backward and see how much delay or slack.
- Rotary head & stabilizer
- Check the chuck or rotary drive that holds the pipe/tube — ensure jaws engage firmly, concentricity is good.
- Inspect the stabilizer (if used) — look for worn parts, mechanical slack or misalignment.
- Spin a test tube (even no cut) and check runout at various points.
- Z-axis / torch height mechanism
- Move the Z-axis and gauge that motion is smooth, no stiction.
- Inspect any torch height control mechanism or floating head — ensure it responds properly.
- Torch mounting & break-away mechanism
- The torch holder should be rigid, well-mounted, and ideally have a break-away or collision protection system.
- Check mounting bolts, alignment, wear points.
B. Electrical, Control & Interface
- Control / CNC electronics / drives
- Power up the control; check operator panel, menu responsiveness, ability to input motion commands.
- Inspect the cabinet: look for overheated wires, dust, rust, corroded contacts, burned insulation.
- Ensure drives, power supplies, and servo amplifiers are present, undamaged, and properly ventilated.
- Cabling, wiring, connectors
- Check wiring harnesses for frayed insulation, damaged shielding, poor strain reliefs.
- Ensure connectors are solid, not loose or corroded.
- Sensors / limit switches / safety interlocks
- Trigger limits on each axis and confirm motion halts.
- Open any doors or covers that should disable motion and confirm safety logic.
- Test any E-stop and whether it properly stops all axes.
- Software / firmware
- Ask to view version info, parameters, offsets.
- Request backup of all system parameters and configuration files.
- Check whether the control is locked or limited (some machines may have disabled features).
C. Functional Testing & Cutting Trials
- Dry motions
- Without plasma on, run all axes through their full strokes. Listen for smoothness, observe velocity changes, check for anomalies.
- Command small incremental moves (e.g. 1 mm, 10 mm) and check actual vs expected distance.
- Torch “fire” test
- Test the triggering of the plasma torch (if the plasma generator is connected). Check that the machine can start / stop arcs automatically (if supported).
- Verify the “Arc OK / Begin Traverse” signal works (if used).
- Cutting test with material
- Bring sample tubing (e.g. schedule 40 steel) and run basic cuts, holes, slots, etc.
- Evaluate edge quality, cut kerf, dross, squareness of cut, dimensional tolerances.
- Run cuts near maximum capacity and test longer runs.
- Thermal / stability test
- Run a few back-to-back cutting jobs over 30–60 minutes and see if any axis starts to drift, heat up, or lose precision.
- Recheck the alignment / referencing after warm-up.
- Repeatability & accuracy
- Cut identical features repeatedly and measure variation.
- Return-to-zero tests, reposition and re-cut the same spot to see shift.
D. Documentation & Parts / Support
- Machine identity / serial / build records
- Verify serial number, manufacture date, revision.
- Ask for build or acceptance test records, calibration sheets if exist.
- Service / maintenance history
- Get a log of past repairs, parts replaced (servo motors, rails, torch, cables).
- Ask about down-time or major faults.
- Spare parts inventory & availability
- Confirm whether consumables (plasma tips, electrodes, cables), drives, controllers, rails, bearings can be sourced.
- If any parts were custom or obsolete, ask for replacement pathways.
- Software, licensing, CAD/CAM tools
- Verify you get the software (e.g. Cam-A-Lot or whatever JD2 uses) and license transfers.
- Ask for part programs, parameter backups, tool libraries.
- Warranty / acceptance terms
- Try to negotiate a limited warranty or acceptance period after installation.
- Define performance metrics (e.g. acceptable tolerances, repeatability) that the machine must meet post-install.
4. Key Risk Factors & Red Flags
Watch for these during inspection — any of them should force heavy discounting or rejection:
- Extreme rail or guide wear / damage — beyond economical repair
- Servo motors or drives inconsistent, noisy, or overheating
- High backlash or play in axes or rotary drive
- Torch holder damaged, misaligned, or missing
- Control / electronics cabinet in poor condition (burn marks, corrosion, tampering)
- Missing or locked software / firmware, or missing control modules
- Poor wiring, electrical modifications, or spliced cables
- Axis drift under thermal load
- Cut quality far below expectation
- Parts or consumables obsolete or unavailable, especially plasma parts, controllers, rails
- Seller refuses test cuts or control access
If even one serious red flag is present, your risk is high — proceed only with strong contractual protections.
5. Decision & Acceptance Criteria
Before deciding, set hard pass/fail thresholds:
- The machine must hit ≥ 90–95 % of its advertised performance on your test cuts (dimensional accuracy, cut quality).
- Backlash and repeatability must be within your tolerance (e.g. <0.1 mm or better as your process demands).
- All axes must run full stroke smoothly, with no binding or noise.
- The torch must fire reliably, arc signals or triggers must function.
- Control, electronics, and safety systems must be fully functional.
- The spare parts risk must be acceptable — you must be able to get consumables and critical spares.
- You must get full software, parameters, program backups, manuals, and control rights.
- The cost to repair or refurbish (if needed) plus transport must still leave margin vs buying a new or better machine.
- The seller should accept a conditional acceptance period or hold-back until post-install testing is done.
If the machine clears all criteria, then you can proceed with confidence.