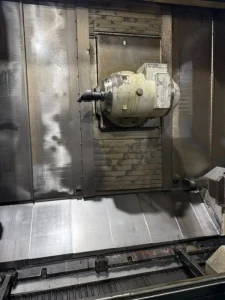
Industrial Insights: How to Spot Quality in Pre-Owned, Used, Secondhand, Surplus CNC Equipment Before Purchase Agie Charmilles Cut 20P Wire EDM made in Switzerland
When evaluating a pre-owned / surplus Wire EDM machine like the Agie Charmilles CUT 20P (Swiss-made EDM), you must go well beyond just “does it power up.” Wire EDM is a precision electro-erosion process, and small degradations, wear, or undocumented modifications can drastically affect accuracy, surface finish, and long-term reliability. Below is a rigorous, technically grounded inspection framework (and red-flag checklist) tailored to a machine like the the CUT 20P.
1. Understand the “Baselines” / Nominal Specs
Before inspection, have the nominal specs in hand to compare. For the CUT 20P model, some known parameters are:
- Travel (X × Y × Z): approx. 13.8″ × 9.8″ × 9.8″ (≈ 350 × 250 × 250 mm)
- U / V axis (taper / offset axes): ~1.77″ (≈ 45 mm)
- Table / work surface: ~27.55″ × 18.89″ (≈ 700 × 480 mm)
- Part load capacity: ~ 882 lb (~400 kg)
- Dielectric tank capacity: ~211 gallons
- Wire diameter range: from ~0.004″ up to ~0.012″ (≈ 0.10 mm to 0.30 mm)
- Auto threading (automatic wire threading) is a standard feature on this model
- The machine is typically submerged (workpiece under dielectric fluid)
These specs set your benchmark. If a used unit deviates substantially (especially in motion travel, U/V range, or table load), that’s a warning sign or indication of a mis-labeled/modified unit.
2. Pre-Visit Document Review
Before visiting the seller:
- Service / maintenance logs — especially consumables: wire guides, nozzles, flushing system, dielectric filtration, high-voltage generator maintenance
- Total “cut hours” vs idle hours — many issues in EDM stem from high-on-time vs actual cutting-on-time
- Original factory drawings, schematics, parts lists
- Software / controller version & licensing — make sure the control, firmware, and EDM generator versions are supported or documented
- Spare parts history: Has the generator been rebuilt, exchanged? Are original wire guides, servo amps, power modules, pump spares still available?
- Calibration / alignment records, prior accuracy tests
This gives you a baseline to compare what you see.
3. Visual & Physical Inspection (On-Site)
Once on-site, you should perform a careful walk-through, focusing on structural, mechanical, and erosion components.
3.1 Frame, Structure & Tank
- Frame integrity: Look for cracks, stress fractures, weld repairs, distortions in the machine base, gantry, column, or tank walls
- Tank / dielectric vessel: corrosion, pitting, leaks, liner condition
- Fluid level indicators, overflow systems: are they intact, free from blockage or corrosion
- Seals, gaskets, access hatches: condition, leaks, tampering
3.2 Guideways / Linear Motion & Positioning
- Guide rails / linear ways / cross-slides: inspect for scoring, dents, wear tracks
- Sliding friction / stick-slip: manually move axes (if possible, with power off) and feel for smoothness
- Ball screws / lead screws (if present for U/V or Z): check backlash, axial play, runout, wear
- Encoders / feedback scales: look for damage to scale surfaces or read heads, cleanliness, alignment
- Wiper seals & scrapers: should keep grit, dielectric and wire debris out
- Cross-axes coupling / stiffness: check squareness, that axes remain perpendicular under motion
3.3 High-Voltage Generator & Power Electronics
- Generator / power module: visually inspect for burn marks, loose wiring, replaced modules, signs of repair
- Cooling & ventilation: fans, heatsinks, filters — are they clean and operating
- Power cables, bus bars, insulators: check for signs of voltage flash, surface discoloration, insulation breakdown
- Control cabinet: cleanliness, moisture ingress, wiring harness condition, damaged PCB components
- Grounding & shielding: critical for precision EDM — inspect for proper grounds
3.4 Wire Feed / Guides / Flushing System
- Wire guides and guide blocks: check for wear, carbonization, misalignment, burrs
- Wire tensioning mechanism: ensure it moves smoothly, tension is adjustable and holds steady under test
- Wire spools, payout reels, spool tensioners: check bearings, alignment, smooth feed
- Flushing pumps, filters, filters media, recirculation: dielectrics must be clean; check for clogged filters or damaged plumbing
- Dielectric filtration and purification: e.g. paper filters, ion exchange, filtering cartridges
- Nozzles, break-off point, wire exit path: check for wear, erosion, burrs
3.5 Mechanical / Moving Parts & U/V Taper Axes
- U / V axes (for taper / offset): travel range, smoothness, backlash, alignment
- Pivoting / tilting hardware: check for wear, play, binding
- Collision protection / limit switches: verify that stops, sensors, interlocks are present and functional
3.6 Soft Components & Wear Items
- Wire guides (ceramic or hardened materials) — these wear over time
- Nozzles / orifice / electrodes
- Seals and O-rings — in hydraulic or pneumatic systems if used
- Dielectric hoses / tubing / valves — check for abrasion, cracks, brittleness
- Filters, cartridges, screens
3.7 Calibration / Reference Components
- Test artifact (if available): block or part with precision dimensions used to test the machine
- Leveling / alignment standards: check if machine base is level, if ways are aligned
4. Functional & Performance Testing
This is the “acid test” — even a visually great machine may fail in real operation.
4.1 No-Load / Dry Motion Test
- Jog all axes through full travel, at slow and moderate speeds, listening and feeling for jerks, binding, stiction
- Reverse direction, stop/acceleration tests
- Check for consistency, repeatability under no load
4.2 Wire Threading / Auto Thread Test
- Execute the automatic wire threading cycle
- Observe repeatability, reliability (how often does it fail)
- Check log of threading cycles in past usage
4.3 Simulated Cut / Path Test (Without Cutting)
- Run a simple contour (square, circle) movement under CNC commands
- Pause mid-run, reverse, circle back — check for drift, positional errors
- Use a dial indicator or displacement sensor to verify commanded moves vs actual
4.4 Wet Cutting Test (Preferred)
- Perform an actual cut on typical material you intend to use
- Cut test shapes: squares, circles, slits, taper cuts
- Measure results (kerf, taper, surface finish, dimensional accuracy) versus expected benchmarks
- Inspect surface quality: look for striations, recast layer, rounded edges, undercuts
4.5 Long-Run / Thermal Test
- Run extended cutting (or at least sustained motion + dielectric circulation) for multiple hours
- Monitor for drift, overheating, changes in accuracy, power drift
4.6 Repeatability / Backlash Test
- Perform repeated movements (e.g. back-and-forth 10×) and measure deviation
- Test in multiple axes and quadrants
5. Red Flags & Deal-Breakers
Watch out for these warning signs — any of them can significantly diminish the machine’s value or viability.
| Red Flag | Why It’s Critical | Comments / Severity |
|---|---|---|
| Heavily corroded or pitted tank & structural damage | Indicates poor maintenance or exposure to harsh environment | Potential leaks, distortions, contamination |
| Worn or scored guideways, rails, or slides | Degrades motion accuracy, introduces backlash | Major repair / regrind needed |
| Missing or damaged wire guides / nozzles / wear parts | Hard or expensive to replace; critical for performance | Without originals, acceptable tolerance may degrade |
| Unreliable automatic wire threading | Frequent failures slow production | Manual threading is cumbersome; also suggests guide wear |
| Control / generator modules with signs of overheating or repair | May fail or be out of spec | Replacement modules could be expensive or obsolete |
| Lack of service / maintenance records | Unknown wear history raises risks | Hard to trust claimed performance |
| Obsolete / unsupported control / firmware | Cannot update, maintain or integrate with modern systems | May limit future capability |
| Unable to perform a real cut test | You can’t verify capability | Accept only after test cuts |
| Lack of calibration / alignment references | Without baseline, you can’t check performance | Means unknown accuracy |
| Missing or incompatible spare parts | Hard to maintain, more downtime | Risk of being “stranded” |
| Excessive wiring modifications or cabling mishmash | Indicates prior “fixes” or poor maintenance | Hidden issues |
| Dielectric filtration in poor condition | Dirty dielectric degrades EDM performance heavily | May increase wear on generator & wire path |
Any machine that shows multiple red flags should cause you to reconsider the purchase or negotiate a steep discount.
6. Risk Estimation & Lifecycle Assessment
- Determine the remaining life of high-wear consumables (wire guides, nozzles, seals)
- Understand lead times and costs for exotic replacement parts (especially generator modules, outdated controller boards)
- Assess whether the machine’s accuracy performance (after refurbishment) justifies its price
- Build in contingency budget for re-calibration, part replacement, retrofit
- Consider whether the seller will guarantee performance or accept return if cut test fails
7. Contract Safeguards & Negotiation Tactics
- Acceptance / Test-Cut Clause: Only finalize payment after successful test cut to your satisfaction
- Holdback / Escrow: Retain part of payment until acceptance
- Spare Package: Insist that seller include wire guides, nozzles, filters, spare modules
- Documentation & Licensing: Secure all manuals, schematics, software licenses in writing
- Warranty / Guarantee: Even if limited, get a short-term warranty for core systems (generator, control, major mechanicals)
- Reconditioning / Overhaul Agreement: If possible, commission a refurbishment before shipping