From Inspection to Installation: What to Verify Before Buying a Pre-Owned, Used, Secondhand, Surplus HARLEY HP-751 Receding Die Head Pipe Threader made in USA
General Overview
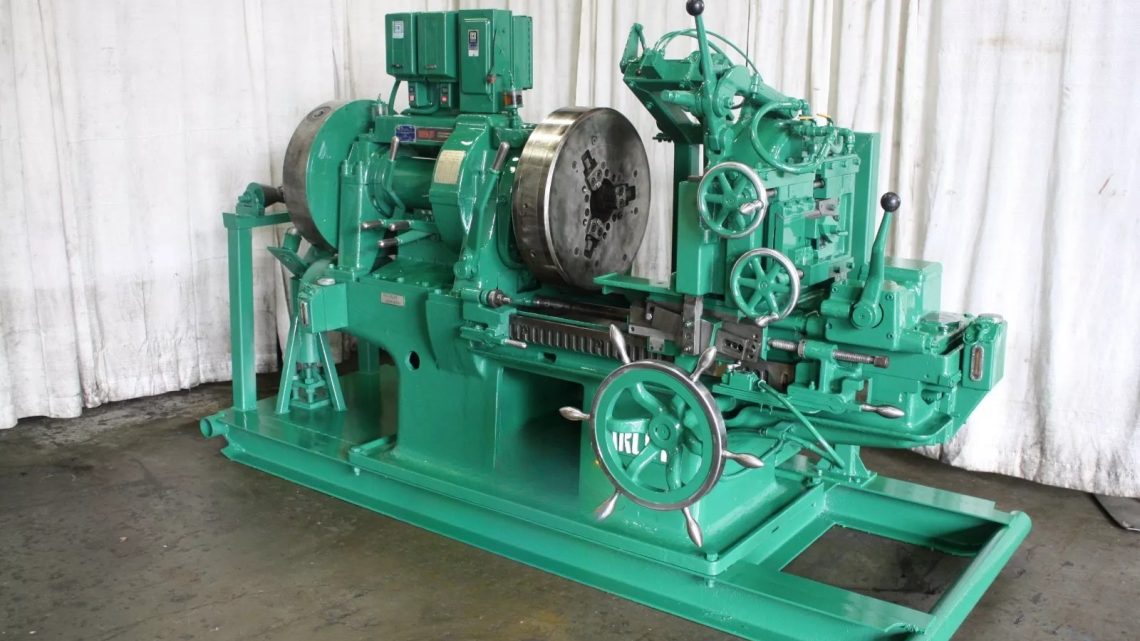
The HARLEY HP-751 is a heavy-duty receding die head pipe threader manufactured in the United States. Designed for precision threading of industrial pipes, it remains a reliable machine even after decades of use, provided that mechanical and electrical systems are in proper condition. Typical units were produced in the late 1970s and feature a 5 HP motor, front and rear three-jaw chucks, a coolant circulation system, and a variable-speed drive mechanism.
Typical Specifications:
- Pipe capacity: 2-19/32″ to 4-3/4″
- Main motor: approximately 5 HP
- Drive type: geared head with mechanical clutch
- Threading system: receding die head with spring-loaded chasers
- Accessories: coolant tank, pump, and protective guards
1. Identification and Documentation
Before purchase, verify the following information:
- Confirm the model and serial number engraved on the machine nameplate.
- Obtain the original operator’s and parts manuals, along with the electrical diagram.
- Request documented maintenance or service records.
- Confirm the included tooling: die heads, chaser holders, coolant lines, and protective covers.
2. Mechanical Condition
Mechanical integrity determines long-term reliability. Examine each element carefully:
- Inspect the bedways and carriage slides for wear, scratches, or corrosion.
- Check the receding die head assembly for smooth opening and closing without backlash.
- Evaluate both 3-jaw chucks for jaw wear and run-out accuracy.
- Inspect the feed screws, bearings, and gear trains for excessive play or noise.
- Verify the threading capacity and overall travel against manufacturer data.
- Check the coolant pump, reservoir, and piping for leakage or contamination.
3. Electrical and Drive System
Aging electrical systems are often overlooked.
- Confirm that the motor voltage matches your plant power supply (e.g., 220/440V, 3-phase).
- Inspect all wiring insulation, contactors, switches, and control buttons.
- Test forward and reverse spindle rotation and clutch engagement.
- Verify emergency stop and safety interlock functionality.
- Observe current draw under load and ensure stable operation.
4. Threading Accuracy and Functional Testing
Functional inspection under power provides the most accurate assessment.
- Conduct a trial threading operation and check the pitch, flank angle, and surface finish.
- Measure chuck concentricity and thru-hole run-out.
- Observe any vibration, chatter, or irregular feed movement.
- Ensure that the die head retracts automatically at the correct timing.
5. Lubrication and Cooling System
Proper lubrication prevents early failure.
- Inspect all lubrication points and confirm oil flow.
- Replace oil and coolant with clean, manufacturer-recommended grades.
- Check for sludge buildup in tanks and lines.
- Verify pump performance and coolant flow rate.
6. Spare Parts and Tooling Availability
Due to the machine’s age, spare part sourcing is essential.
- Identify suppliers for chasers, dies, and die head components.
- Check compatibility with Landis-type or other standard chasers.
- Verify condition of springs, pins, and retaining assemblies in the die head.
- Consider fabricating or retrofitting components if originals are unavailable.
7. Safety and Compliance
Older machines should be reviewed for modern safety standards.
- Inspect all guards, covers, and safety labels.
- Test limit switches, coolant containment, and chip protection.
- Ensure the base frame is free from cracks or welded repairs.
- Confirm all control panels have grounded enclosures and protective relays.
Installation and Commissioning Procedure
1. Positioning and Leveling
- Place the machine on a rigid foundation and check horizontal alignment.
2. Electrical Connection
- Verify voltage compatibility and correct phase rotation before energizing the system.
- Ensure secure grounding and proper cable termination.
3. Lubrication and Initial Run
- Fill reservoirs with the specified oils.
- Run the machine at low speed to circulate oil and check for leaks or abnormal noise.
4. Coolant Setup
- Fill the coolant tank with clean cutting fluid.
- Test pump operation and check flow at the tool point.
5. Functional Testing
- Test chuck engagement, feed motion, and die head retraction cycle.
- Conduct a short threading operation and inspect the output.
6. Safety Verification
- Test emergency stop switches and verify all guards are properly installed.
7. Operator Familiarization
- Provide training on operation, lubrication intervals, and die replacement procedures.
Key Risks and Precautions
- Excessive bed wear can require expensive regrinding and alignment.
- Aged electrical wiring may not meet current insulation standards.
- Replacement parts for HARLEY models can be limited; confirm sourcing options.
- Improper leveling can cause taper errors and poor thread finish.
- Inadequate packing or transport handling can result in alignment damage.
Final Summary
The HARLEY HP-751 Receding Die Head Pipe Threader is a robust and precise industrial threading machine. When correctly inspected, maintained, and installed, it can provide decades of service with consistent accuracy. Buyers should prioritize verification of mechanical wear, electrical integrity, and die head functionality before purchase. Professional installation, careful leveling, and correct lubrication are critical to achieving optimal performance and long-term reliability.