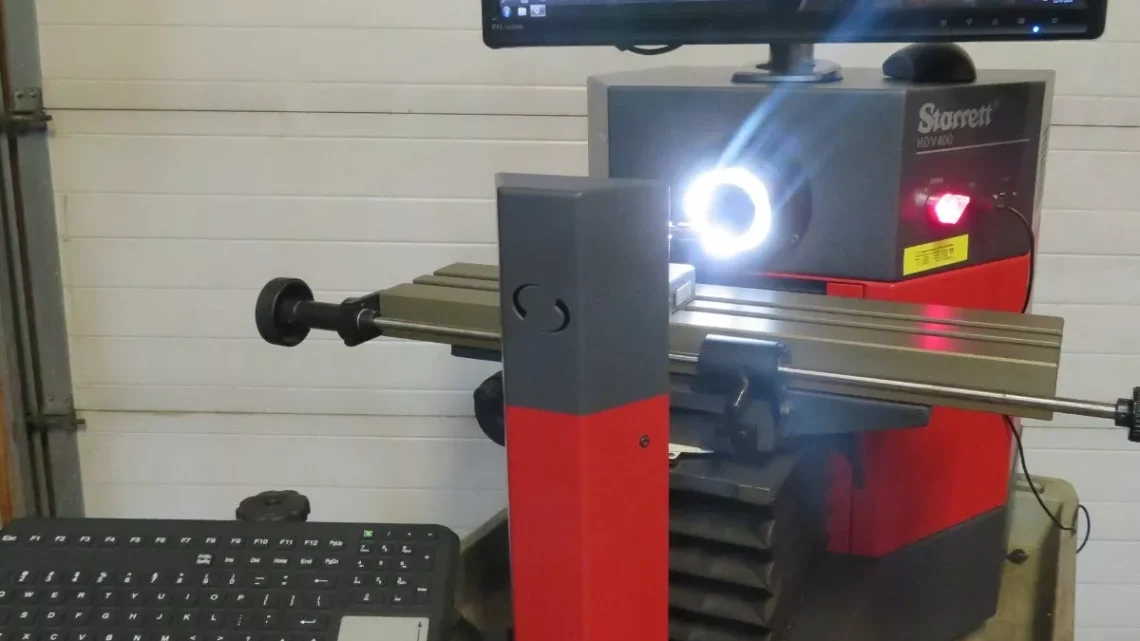
From Factory Floor to Your Workshop: Evaluating a Pre-Owned , Used , Secondhand, Surplus CNC Machines Before Purchase Starrett HDV400-M3-2LED Horizontal Digital Video System Comparator
Below is a tailored evaluation guide you can use when inspecting a Starrett HDV horizontal digital video comparator (e.g. “HDV400-M3-2LED” style) in used / surplus condition. Because video comparators are precision metrology instruments (not “machines” in the machining-tool sense), the inspection emphasis shifts more toward optical, electronic, calibration, and environmental checks—alongside mechanical motions and structural integrity.
I cover:
- What the HDV / digital video comparator is and key specifications
- Major risk & wear points to check
- Step-by-step inspection & test procedure
- Decision criteria & red flags
- Suggestions for negotiation leverage
1. What Is the Starrett HDV / Digital Video Comparator & Key Specs You Should Know
This type of instrument blends the features of a horizontal optical comparator with a video / vision system. It projects, magnifies, images, and measures parts using optics + camera + software. The HDV series is a well-known example.
Key known / advertised specs for the HDV-400 / similar models you should validate:
| Parameter | HDV-400 Typical Value | Comments / Source |
|---|---|---|
| Stage travel (X × Y) | 400 mm × 150 mm (16″ × 6″) | |
| Resolution / Scale | 0.5 µm (0.00002″) via Heidenhain glass scales | |
| Accuracy (X-Y) | E1 = 3.0 µm + L/33 (where L is measurement length) | |
| Camera / Video System | 5 megapixel digital camera, telecentric lens options, video edge detection (VED) capability | |
| Illumination | LED surface and profile illumination, optional transmitted lighting, etc. | |
| Focus Travel | Approximately 51 mm (2″) focus range | |
| Load / Weight on Stage | Typically ~ 50 kg (110 lbs) maximum load | |
| Optical Distortion | Very low distortion tolerances, ~0.001% in telecentric field of view |
Because your specific unit is “HDV400-M3-2LED,” you should also verify:
- That the MetLogix M3 software is installed and operational
- That the 2 LED illuminations are working (surface LED, profile LED)
- That the camera, lenses, and telecentric modules are intact and not scratched / misaligned
- That the scale / encoder system (likely glass linear scales) is intact and functional
These spec values form your “target envelope.” Any deviations you measure (± drift, scale errors far outside tolerance) should raise concern.
2. Major Wear / Risk Areas to Focus On
Because video comparators are optical-mechanical-electronic hybrids, the likely failure or degradation points include:
- Optical path & lenses — scratches, dust, alignment drift
- Camera sensor — dead pixels, sensor degradation, color balance drift
- Illumination system — LED aging, uneven brightness, flicker
- Linear scales / glass encoders — scale damage, contamination, misalignment
- Stage mechanics (X, Y, focus / Z) — backlash, stiction, wear in guides
- Electronics / controllers / software — corruption, board damage, failed components
- Calibration / reference standards — missing or invalid calibration records
- Environmental sensitivity — vibration, temperature drift, cleanliness affecting performance
Because optical and video systems are delicate, even small misalignments can degrade measurement accuracy severely.
3. Step-by-Step Inspection / Test Procedure
Here’s an ordered checklist for when you inspect a used HDV / video comparator:
A. Pre-Inspection / Documentation Request
Before going onsite:
- Request system serial numbers, model plate photos, and specifications sheet
- Ask for calibration history / certificate, last calibration date, drift records
- Request the software version, backup of configuration / measurement programs
- Ask for photos/videos of the unit in operation
- Ask which lenses, camera modules, illumination modules are installed
- Ask for maintenance / repair logs (electronics, optics, stage service)
- Ask why the unit is being sold
If the seller can’t provide calibration records, that’s a red flag but not necessarily deal-killer (provided you can recalibrate afterward).
B. Structural / Mechanical Inspection
- Check the frame, base, optical housing for cracks, warping, damage
- Inspect protective covers, lens covers, dust seals, bellows
- Examine for signs of collisions, knocks around the optical path or stage
- Check that mounting and alignment mechanisms are intact
C. Stage / Motion & Scale / Backlash Tests
- Manually (or via motorized move at slow speed) move the X, Y stage through full travel — smoothness is key
- Place a calibrated reference gauge or precision grid and move stage; watch for jumps, slippage
- Use a dial indicator or high-precision probe to measure backlash / lost motion in X and Y (push-pull test)
- Reverse direction and check for hysteresis / deadband
- Check the focus (Z or lens movement) axis for smooth motion and backlash
- Use a known calibration grid / stage micrometer to check scale accuracy across travel
D. Optical / Video / Imaging Tests
- Inspect lenses and optics visually — look for scratches, dust, haze, fungus
- Turn on illumination (surface / profile / transmitted) and check uniformity, brightness, absence of flicker
- Capture static test images and check for artifacts, noise, dead pixels
- Use a calibrated grid or precision artifact to test distortion, linearity, edge detection precision
- Import a CAD / DXF overlay and test video edge detection (VED) to see if software alignment works properly
- Test magnification switching or lens changes (if dual-lens mount) for alignment consistency
E. Electronics / Control / Software Review
- Open electronics / control enclosure: inspect wiring, PCBs, connectors, power supplies for damage, heat marks, solder issues
- Boot up software / control: check that the software launches without errors, configuration loads
- Verify that the MetLogix M3 (or equivalent) software features (edge detection, CAD overlay, measurement routines) operate correctly
- Check logs / error history if available
- Test measurement routines (you might run a simple test program) to confirm repeatability
F. Calibration & Drift / Repeatability Tests
- Perform a repeatability test: measure the same feature multiple times, retract stage, re-measure — compute standard deviation
- Perform reversal / backlash verification: move to point, retract, return, measure deviation
- Measure at multiple positions across the field to check scale linearity / distortion
- After running for some time (warm-up), re-check calibration to see drift
- If possible, compare known, certified reference standards before/after to quantify error and stability
G. Environmental / Practical Checks
- Measure ambient temperature, humidity — compare to known tolerances for optical metrology
- Check vibration or shock in the floor area (is the comparator in a stable, low-vibration area?)
- Inspect power supply stability (voltage fluctuations, grounding)
- Confirm that spare optics, lenses, camera modules are available or included
- Check for mechanical cleanliness (no dust, foreign particles) around optical surfaces
4. Decision Criteria & Red Flags
Here’s how to interpret your findings and decide whether or not to acquire the unit (or negotiate heavily).
Good / Acceptable Indicators:
- Stage motion is smooth, backlash minimal, linear scales read correctly
- Optical path is clean (no haze, dust, lens damage) and image quality is crisp
- Illumination works uniformly, no flicker or dead zones
- Camera and software (MetLogix M3) run properly, edge detection and overlays function
- Calibration checks show error within acceptable tolerance (e.g. less than a few µm over travel)
- Repeatability test has low standard deviation (< a few microns)
- Equipment has calibration records or certificates
- Spare optics / modules are included or available
- Enclosure / housing is intact, no damage or signs of abuse
Red Flags / Deal-Breakers:
- Cracked, scratched, or hazed lenses / optics
- Major drift or inconsistent calibration across the field
- Dead pixels, noise, or artifacts in imaging
- Stage motion is jerky, binding, or inconsistent
- Large backlash or subjectivity in motion
- Edge detection or overlay routines do not match or are unreliable
- No calibration history, or last calibration many years ago with no record
- Burned or damaged electronics / PCBs, corrupted software, failed power supplies
- Missing or proprietary optics that are extremely expensive or obsolete
- Environmental vulnerability (vibration, temperature instability)
- Seller refuses imaging tests, calibration verification, or access to software
Use any defects or degradation you see as negotiation leverage: demand discount, spare modules, recalibration service, or partial refund if performance doesn’t meet specs after installation.