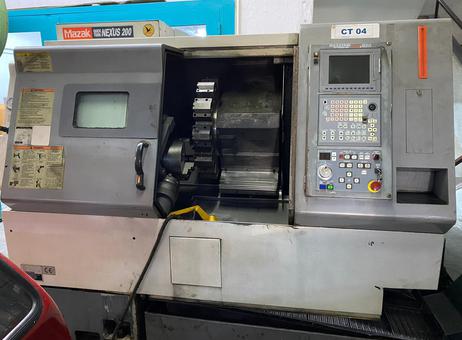
From Factory Floor to Your Workshop: Evaluating a Pre-Owned , Used , Secondhand, Surplus CNC Machines Before Purchase Mazak Nexus 200 CNC Lathe made in Japan
Here is a comprehensive guide (with Mazak “Nexus / Quick Turn 200” context) to help you evaluate a pre-owned / secondhand / surplus Mazak Nexus 200 CNC lathe before purchase. Use this as your on-site checklist, diagnostic roadmap, and negotiation tool.
1. Know the Machine — Baseline Specs & What You Should Expect
Before you even visit the machine, obtain as many factory spec sheets, user manuals, “as shipped” data, and documentation as possible. These figures become your “control envelope” against which you compare what you find.
Here are typical published (used / current) specifications for Mazak Nexus / Quick Turn 200 series lathes that will serve as reference points:
| Spec / Feature | Typical Value | Source & Notes |
|---|---|---|
| Max Swing | 24.02 in (~ 610 mm) | e.g. the 2009 Nexus Quick Turn 200 II listing gives this. |
| Max Machining Length / Between Centers | ~ 20.16 in (~ 512 mm) | Premier Equipment listing for a 2005 Nexus 200 shows machining length ~20 in. |
| Spindle Speed (max) | 5,000 rpm | Multiple used equipment sources list 5,000 rpm top speed. |
| Spindle Power / Horsepower | 35 HP (some derated to 30 HP) | The 2005 listing: 35 / 30 HP. |
| Turret / Tool Stations | 12-station turret (often VDI or bolt-on style) | Common in many listings. |
| X / Z Travel | X ~7.5 in, Z ~21.125 in | From the 2009 Nexus Quick Turn 200 II listing. |
| Spindle Bore / Through-Hole | ~3 in bore (~76 mm) | Some listings of “3-inch bore” for spindle bar capacity. |
| Chuck Size / Bar Capacity | 8 in chuck, ~2-2.5 in bar capacity | Many units use 8″ chucks; bar capacity often ~2″ (~50–65 mm) in listed machines. |
| Control / CNC System | Mazatrol 640T Nexus (or Nexus / Mazatrol Fusion) | The 2005 model used a Mazatrol Fusion 640T. |
| Weight / Footprint | Several tons / large footprint | The machines are heavy; e.g. the Gindumac listing has mass ~4,800 kg for an MS variant. |
Use these specs as your “target window.” If the machine you inspect deviates markedly (e.g. far lower max speed, missing turret, drastically reduced travel, etc.), that’s a warning sign.
Also note: the “Nexus 200” model is part of Mazak’s Quick Turn family; “Nexus” typically denotes the control generation / upgrade (e.g. interactive Mazatrol) rather than a fundamentally different mechanical base.
2. Pre-Inspection / Documentation Requests
Before you arrive on site, request as much of the following as possible. The presence — or absence — of good documentation is itself a strong indicator of the seller’s transparency.
| Document / Information | Key Questions | Why It Matters |
|---|---|---|
| Maintenance / service logs | Has the spindle ever been rebuilt? Turret repairs? Major overhauls? | A well-documented history suggests the machine was cared for; gaps or missing records are red flags. |
| Operating / cutting hours | Can the CNC / control log total and cutting hours? | High cutting hours accelerate wear (spindle bearings, ways, drives). |
| Crash / accident history | Any known collisions, overtravel, crashes? | Structural or alignment damage from accidents is often expensive to fix. |
| Retrofitting / control upgrades | Has the machine’s control, drives, or turret been modified? | Non-original parts complicate future servicing or compatibility. |
| Spare parts inventory | Does the seller own spare components (bearings, turret parts, encoders)? | Good spare parts reduce downtime risks. |
| Accessories and tooling | Chucks, tool holders, collets, live tools, steady rest, tailstock, software, wiring diagrams | Missing accessories add cost after purchase. |
| Transport / rigging plan | How will the machine be moved, disassembled, aligned? | The rigging cost and alignment risk are nontrivial. |
| Inspection / trial rights | Will you be allowed to power it up, run test cuts, jam in your tooling? | Without real trials, you risk hidden defects. |
| Return / acceptance clause | Can you reject or return it after installation if defects surface? | Protects you against latent problems. |
If the seller refuses or hesitates to provide even basic documentation, that’s a red flag.
3. Visual & Structural Inspection (Before Powering On)
Before you plug anything in, do a careful walk-around and manual inspection. Many serious defects can be identified without power.
A. Structure, Castings, Guards & Overall Condition
- Examine the bed, saddle, headstock, and tailstock castings for cracks, weld repairs, distortions, or signs of past collisions.
- Check for wear, corrosion, pitting on exposed machine surfaces, especially near coolant paths or chip flow zones.
- Inspect way covers, telescopic guards, bellows — if torn, missing, or damaged, contaminants (chips, coolant) may have damaged the ways.
- Look at the control cabinet, access panels, covers, doors, interlocks — are they present, solid, properly closed? Poor or missing panels are a sign of neglect or modification.
- Check the wiring harnesses, conduit, connectors, cable carriers — look for chafing, nonstandard splices, tape wraps, or exposed wiring.
- Inspect the turret / tool changer magazine / arms visually: bent fingers, alignment marks, wear, broken parts.
- Inspect the chuck / front spindle face area for dents, damage, corrosion, or misalignment.
- Examine coolant tank, piping, sump, chip conveyor if present — sludge, corrosion, missing parts, or leaks suggest neglect.
B. Manual / Static Checks (Non-Energized)
- Slowly (manually / with low load) move the carriage / cross-slide / turret if possible, feeling for binding, rough motion, sticking points.
- Use feeler gauges or a small dial indicator to check for backlash / play: push in one direction, reverse, see how much dead motion before movement starts.
- Mount a dummy tool or test arbor (if present) and gently check for axial / radial play (wiggle) in the spindle.
- Inspect turret indexing (if you can move it manually) to feel whether indexing is smooth or has resistance / binding.
- Check lubrication / oiling lines, grease points, fittings — clogged, missing or corroded lubrication is a major negative.
If you find structural damage or evidence of crash repairs, those deserve deep discounting or even walk-away consideration.
4. Power-Up & Initial Electrical / Control Checks
Once your visual inspection is acceptable, power up the machine carefully (ensuring all safety, grounding, and pre-checks are satisfied).
- Observe the boot sequence / control startup: look for errors, missing modules, warnings, or unexpected messages.
- Operate control keys, buttons, display screens, and confirm the interface is responsive and intact.
- Move to manual / jog mode, and command each axis (slow speed) to see whether motion is smooth, whether alarms fire, or whether drives fault.
- Test safety circuits: E-stop, door interlocks, limit switches. Ensure none are bypassed or defeated.
- Check power consumption / stability (if instrumentation is available) for irregular surge behavior, current spikes, or voltage instability.
- Try feed override, spindle override, etc., and test whether those operate as expected.
If the control fails to boot cleanly, shows errors, or axes don’t respond, that can signal big hidden repair costs.
5. Motion / Axis Testing & Accuracy Checks
Assuming axes respond, proceed to dynamic tests to evaluate how well the machine moves, repeats, and holds tolerance.
A. Axis Motion / Reversal Tests
- Command axis motion across the full range at different speeds (low → medium → fast) and listen for noise, grinding, binding, hesitation.
- Reverse each axis and use a dial indicator (or measurement method) to check backlash / reversal error.
- Move to a point, then move away and return, and check how precisely the axis returns — this tests repeatability.
- Execute compound motions (e.g. simultaneous X+Z moves, or circular interpolation if the machine supports it) to assess coupling, smoothness, timing.
- If possible, run a ballbar test or circularity test to detect geometric / servo / backlash errors.
B. Spindle & Chuck Tests
- Run the spindle at multiple speeds (low, mid, high), listening carefully for bearing noise, hum, vibration.
- Mount a test bar or indicator on the spindle nose and measure radial runout.
- Let the spindle run for an extended time to see whether noise, vibration or temperature drift develop.
- If feasible, perform a light machining cut (e.g. facing) with a modest load to see how spindle and machine react under work conditions.
C. Sample Machining / Test Part
- Insist on performing a real cutting test using your tooling or typical materials. For example, turn a cylindrical part, face, groove, do boring, etc.
- Measure the result: dimensional accuracy, repeatability, surface finish, concentricity.
- Attempt “worst-case” cuts (long traverse, heavy cuts) to test how the machine handles deflection, vibration, or chatter.
- Observe chip flow, coolant behavior, chip evacuation, cleanliness in the working area.
- After cuts, inspect the part and compare to target tolerances — if major deviations appear, that reflects machine wear or misalignment.
6. Geometric / Alignment & Metrology Assessments
If you have metrology tools (dial indicators, gauge blocks, straight edges, laser interferometer, etc.), or bring along a metrology technician, perform:
- Straightness of X and Z axes over the full travel (check for sag, bow, deflection).
- Parallelism between spindle axis and carriage axes (X vs spindle centerline, Z vs spindle axis).
- Squareness / perpendicularity: e.g. the cross slide’s travel should remain orthogonal to spindle axis.
- Positional accuracy / linearity: command multiple distances and measure actual travel to check for scale error, deviation, nonlinearity.
- After warm-up, observe thermal drift — whether dimensions or alignments shift over time.
- At extremes (e.g. full Z extension, far ends of X travel), test for deflection / geometric distortion.
Note: Some amount of misalignment or wear is repairable (shimming, adjustment, compensation), but large structural or bent defects are expensive or impossible to fully fix.
7. Estimate Refurbishment, Deferred Maintenance & Hidden Costs
Even a seemingly “good” used lathe will often require work. Anticipate and budget for the following:
- Spindle bearing rebuild or replacement
- Turret / tool changer repair (indexing gear, fingers, cams)
- Repair or replacement of encoders / feedback devices
- Ball screw nut replacement or re-lapping (if applicable)
- Realignment, shimming, scraping of ways or surfaces
- Refurbishment or replacement of sensors, limit switches, proximity switches
- Control / electronics repairs or upgrades (I/O boards, wiring, drives)
- Rewiring harnesses, connectors, repairing chafed or patched cables
- Cleaning, flushing or overhauling coolant, lubrication, filtration systems
- Replacement or repair of chucks, jaws, tailstock, steady rest
- Transport, rigging, disassembly, reassembly, alignment, calibration and commissioning
- Spare parts (bearings, seals, O-rings, turret parts, etc.)
- Contingency buffer (e.g. 15–25 % extra) for surprises
When evaluating offers, always compare the “all-in cost to get the machine into reliable production” rather than just the asking price.
8. Red Flags & Deal-Breakers
During your inspection, be especially wary of any of the following “deal-killer” symptoms (or at least negotiate heavily for them):
- Spindle making loud noises, oscillation, vibration, or noticeably heating — sign of seriously worn bearings
- Control that fails to boot cleanly, chokes on errors, or has missing modules
- Excessive backlash, sloppy axis motion, or binding that seems beyond simple repair
- Evidence of structural damage or welded repairs on bed, column, saddle
- Turret that misindexes, sticks, or shows bent fingers
- Inability to perform any meaningful test cut under load
- Drive faults, erratic motion, alarms during any test
- Missing or badly damaged guards, way covers, or protective covers
- No documentation, wiring diagrams or parts lists
- Obsolete or unsupported electronic modules or controls with no local support
- Seller disallows dynamic tests, sample cuts, or acceptance after delivery
If multiple red flags appear, you should demand steep discounts or walk away.
9. Offer Strategy & Negotiation Tips
- Make your offer conditional on inspection, test cuts, and acceptance — never blind.
- Use the defects or deviations you find (backlash, turret trouble, misalignment) as negotiation levers for discount or repair credit.
- Ask the seller to include spare parts (bearings, turret parts, wiring spares) or a repair allowance.
- Request a trial period / acceptance window after the machine is installed (e.g. run a specified number of hours or parts) to reject if major faults emerge.
- Always compute your “turnkey cost” — purchase + transport + repair / refurbishment + alignment — and compare to alternatives.
- Be ready to walk away — the used-machine market is large; don’t overcommit to a flawed unit.