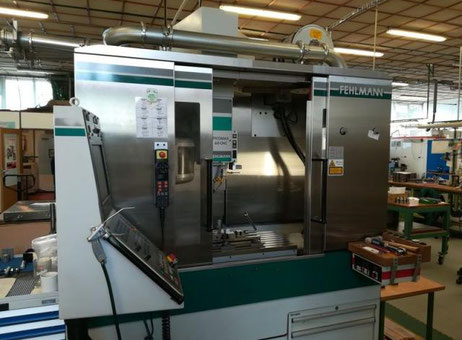
From Factory Floor to Your Workshop: Evaluating a Pre-Owned , Used , Secondhand, Surplus CNC Machines Before Purchase Fehlmann PICOMAX 60-M CNC Vertical Machining Center made in Germany
Buying a pre-owned / second-hand / surplus CNC machining center—especially a precision vertical mill like the Fehlmann PICOMAX 60-M—can be a great opportunity, but it also carries substantial risks. Before committing, you need a disciplined inspection, testing, and evaluation process. Below is a detailed, step-by-step framework (plus peculiarities specific to the PICOMAX series) to help you assess whether the machine is worth acquiring (and what concessions or refurbishments you should budget for).
1. Know the Machine You’re Buying — Key Specs & What to Use as Baseline
Before showing up in person, get as many spec sheets, manuals, and data as possible. Use them as benchmarks for what the machine should deliver, so deviations stand out. Here’s what is known (or typical) for the PICOMAX 60-M:
- The PICOMAX 60-M is a vertical machining center with work envelope (approx): X = 500 mm, Y = 350 mm, Z = 610 mm
- It often comes with a 24-position tool magazine / changer
- Spindle: up to 18,000 rpm in many installations, with SK30 taper in many cases
- Table size ≈ 920 × 380 mm, with load capacity (e.g. ~250 kg) in some listings
- Control: many use Heidenhain control (TNC 426 or variants)
- Weight/footprint & power: the machine is not trivial in mass or size; you’ll need to ensure your floor, crane, electrical supply, coolant, and foundation capabilities match.
Knowing these baseline specs, you can more confidently spot deviations, modifications, or damage.
2. Preliminary Paperwork & Questions to Ask Before the Visit
Before even seeing the machine, get answers (and ideally documentation) for the following:
| Topic | Key Questions / Required Documents | Importance / What to Watch For |
|---|---|---|
| Maintenance & Service History | Logbooks, service invoices, major repairs done (e.g. spindle rebuilds) | Consistent maintenance is a strong positive. No records or large gaps are red flags. |
| Machine usage / operating hours | How many years in service, hours of spindle use, duty cycles, kinds of parts produced | Heavy use in abrasive or hard materials accelerates wear. |
| Incident / crash history | Any collisions, over-travel hits, repairs after accidents | Damage to structure or alignment may persist. |
| Upgrades / retrofits | Changed spindle, new drive electronics, reballing screws, controller updates | Know what is original vs new—upgrades may be good or may hide problems. |
| Spare parts availability | What parts are still obtainable (spindle bearings, control modules, drives) | Older/more exotic components may be expensive or obsolete. |
| Included accessories | Tool holders, probes, fixtures, coolant pumps, probes, fixtures, manuals, schematics, the full tool magazine, safety guards | Missing accessories often become hidden costs. |
| Transport / rigging | How the machine will be moved, whether disassembly is needed, if alignment/calibration is included | The cost of moving and reinstalling a heavy CNC is often underestimated. |
If the seller can’t or won’t provide credible documentation, be very skeptical.
3. Visual & Structural Inspection (Before Power-Up)
Once on-site, before anything is energized, walk through a visual and structural inspection:
A. Exterior & Structure
- Look for cracks, welds, or repairs in the base, columns, saddle, and head. These often indicate past collisions or overtravel.
- Check for corrosion, rust, or pitting—especially in coolant zones, splash zones, or areas where coolant has been allowed to stagnate.
- Confirm all guards, covers, panels, sensors, limit switches — are they present and intact or hastily patched / replaced?
- Examine the wiring harness, conduit, connectors, and cable carriers. Are there chafing marks, splices, or non-OEM changes?
- Inspect the tool changer / magazine: missing fingers, misaligned carriers, damage, bent parts.
- Check the coolant tank, filters, pumps, piping, chip conveyor (if present): sludge, contamination, or corrosion will betray years of neglected maintenance.
B. Mechanical Components (Static Checks)
Even before power, you can do some manual checks:
- Try to manually move each axis (if safe) or use a handwheel: see if there is free play, binding, or unusual stiffness.
- Check for backlash in the ball screws / nuts (pull the axis in one direction, then reverse, and measure how far until motion starts).
- Use an indicator (if possible) to check straightness / flatness on the ways or bed.
- Pull the spindle taper (if possible, with known toolholder) and see how much “wiggle” or play exists.
- Inspect the way covers for wear, tears, gouges, or missing sections. Damaged way covers often allow chips and coolant into the ways, accelerating wear.
- Observe lubrication or oil / way-lube ports. Are they open, clogged, or missing?
- Inspect the linear bearings, guides, and ball screws (or drives) for scoring, debris, or corrosion.
4. Power-Up & Dynamic Testing
After the visual checks, power-up the machine under supervision and move to dynamic testing. Be systematic and cautious.
A. Electrical / Control Tests
- Check the control panel, display, buttons, switches, and interface: do they respond properly? Any error codes on boot-up?
- Check all safety interlocks, e-stops, limit switches, and door/clamp sensors.
- Observe power-up current draw (if you have instrumentation) — any overcurrent, unusual surges, or instability may hint at failing drives or issues.
- Check servo drive modules, motor feedback (encoders), and cabling for obvious faults.
- Test homing / zeroing, limit operations (move to soft limits), check motion in incremental modes.
B. Axis Motion Tests
- Command each axis to move at various speeds and distances: watch for noise, vibration, jerkiness, hesitation.
- Do rapid traverse tests, mid-range feed movement, and slow precision movement.
- Listen carefully for grinding, rattling, squealing (bearings, guide rails, coupling).
- Reverse direction in each axis repeatedly and monitor whether backlash, deadband, or reversal lag is excessive.
- Use an indicator or dial gauge to verify repeatability (e.g. move ± a known amount, return, and see if the actual return is accurate).
- If the control or machine allows, run a ballbar test (or circularity test) to assess axis consistency and geometry errors.
C. Spindle Tests
- Spin the spindle at low, medium, and maximum rpm. Listen for bearing noise, vibrations, hum. A healthy spindle is relatively quiet, smooth, and vibration-free.
- Monitor the temperature rise during continuous operation (if possible). Excessive heat is a red flag.
- Check run-out / radial and axial using a test indicator on the spindle nose or toolholder (if available).
- Perform a rigid tapping (if the control supports) and see how well threads or tap patterns come out.
- If possible, do a light cutting trial (on non-critical material) to see how the spindle performs under load.
D. Test Cut / Part Trial
- Always request or perform a realistic test part. As some users in CNC communities suggest, “cut a circle-diamond-square pattern and check the dimensions” to find errors.
- Try cutting in all axes directions, and under moderate load. Check surface finish, dimensional accuracy, and consistency from one area of the table to the other.
- Try worst-case geometry moves (long travel, combined axes) to stress the machine.
- Monitor whether coolant / chip evacuation is adequate, whether the part or spindle heats up, or whether chatter, deflection, or vibration appears.
5. Geometric / Alignment Checks & Sensor Calibration
If you’re sufficiently equipped (or bring along a metrology technician), perform the following:
- Straightness / squareness checks: using gauge bars, precision steel straight edges, or electronic levels. Check whether axes are perpendicular and straight across travel.
- Flatness / levelness of the table and bed, and measure how consistent Z is across the table.
- Parallelism between axes (X-to-Y plane, X-to-Z, Y-to-Z).
- Position accuracy / linearity: measure actual travel vs commanded travel across the full range.
- Thermal drift: after warm-up, see how much drift occurs in X, Y, Z over time.
- Gravitational or sag error: at extremes of travel (e.g. extreme Z up or down), see if any sag or deflection introduces error.
Beware: alignment and geometry errors can sometimes be corrected, but only up to a point. Large structural misalignments are expensive to repair or may never be fully corrected.
6. Estimate Cost of Deferred Maintenance / Refurbishment
Even a “good” used machine rarely needs no work. Be realistic about pending costs. Some possible refurb / repair items include:
- Spindle rebuild or bearing replacement
- Ball screw nut replacement or regrinding
- Way and guide rail grinding / re-scraping / re-lapping
- Re-lubrication system repair, oil-grease pumps, piping
- Control electronics repair or upgrade (servo drives, feedback devices, cables)
- Replacement or repair of sensors, limit switches, proximity switches
- Rewiring, connector replacement, cable harness overhaul
- Tool changer magazine repair, finger replacement, indexing
- Coolant system pump / filters / piping / tank cleaning
- Recertification, calibration, OEM part sourcing
- Leveling, alignment, shimming, foundation work
Whenever possible, demand from the seller some allowance or discount for upcoming defects you observe (but can’t fully measure on the spot).
Also, budget transport, rigging, installation, alignment, commissioning, and calibration costs — often 10-20 % (or more) of the purchase price for a machine of this size.
7. Evaluate Seller, Warranty & Risk Mitigation
- Seller reputation / references: try to find prior customers, maintenance records, or service providers who know the machine.
- Warranty / guarantee: Even used sellers often can offer limited warranty (e.g. 30–90 days) on key components. Negotiate this.
- Trial / return clause: Negotiate a test period or return clause in case hidden defects appear after move-in.
- Spare parts package: Ask the seller to include or guarantee some spare parts (bearings, seals, couplings, gaskets).
- Support / service network: Is there a technician in your region who can support Fehlmann machines, drive electronics, or Heidenhain controllers?
- Documentation: Ensure you receive operation manuals, circuit diagrams, maintenance manuals, and parts breakdowns.
- Insurance / risk at delivery: cover the machine during transport, and inspect immediately at delivery for transit damage.
8. Decision Matrix & Red Flags
As you inspect, maintain a decision matrix: score or rate each major subsystem (spindle, axes, control, geometry, electronics, structure). Subsystems in “poor” condition may merit walk-away or heavy discount.
Absolute red flags (unless deeply discounted) include:
- Spindle producing loud noise, high vibration, or overheating
- Excessive play, binding, or irreparable wear in axes
- Major structural cracks or previous collision repairs
- Missing or damaged control, drives, or wiring with no replacements
- No documentation or maintenance history
- Obsolete control / electronics with no replacement path
- No way to test or trial the machine under load
- Seller unwilling to provide any bite-back or limited warranty
9. Example: What to Watch Specifically for a PICOMAX 60-M
Given what we know of the PICOMAX 60-M, these points are especially important:
- The high-speed spindle (18,000 rpm) is a delicate component. Bearing degradation is common. Ensure the spindle is quiet, vibration-free, and stable at high rpm.
- The 24-position tool changer is mechanically complex. Missing or bent fingers, misalignment, or indexing troubles are frequent failure points.
- The Heidenhain control and related electronics may be aging. Ensure the control operates reliably and that spare parts are available.
- The relatively modest work envelope means that each axis is likely used frequently; wear on ways, ball screws, and guides can accumulate.
- For some models, connections/option for 4th or 5th axes exists (e.g. rotary tables, 4/5-axis connection) — ask whether these were installed or supported, whether wiring or axes are present.
- Ensure the coolant / chip management system is intact and functional; many buyers neglect that the coolant piping, filters, pumps, and nozzles degrade over time.
- Because Fehlmann machines are less common (compared to, say, Haas or Fanuc machines in some markets), parts sourcing or local serviceability can be more challenging — ensure local tech support is available.
10. Final Offer Strategy & Price Buffer
Given all the risks, it’s wise to:
- Start with a low “as-is, sight-unseen” offer (if you must), contingent on full inspection, testcuts, and acceptance.
- Build in a buffer (say 20–30 %) for unforeseen repairs or refurb.
- Request seller to carry some portion of risk (warranty, spare parts, return clause).
- Factor in rigging, transport, installation, calibration, and downtime costs.
- Consider walking away if the total cost of bringing the machine to “good working production condition” plus purchase exceeds a new or refurb alternative.