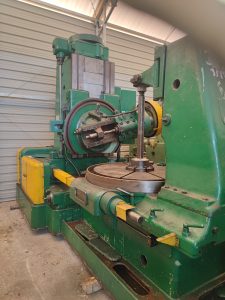
Avoid Costly Mistakes: Professional Tips for Purchasing a Pre-Owned / Surplus / Second-Hand / used OKUMA MA600HB CNC HMC Horizontal Machining Center made in Japan
Here’s a comprehensive due-diligence / “avoid the landmines” checklist when considering a used / surplus Okuma MA-600HB horizontal machining center (HMC). Many of these tips are generic to large horizontal mills, but I’ll also call out issues specific to the Okuma MA-series / MA-600HB based on user reports and published specs.
Use this as a structured guide for inspection, evaluation, negotiation, and commissioning.
What to Know Up Front: Key Specs & Common Issues
Before inspections, it helps to know what “normal” specs are, and what issues owners commonly see.
Typical Published Specs / Configuration (for MA-600HB)
From used machine listings:
- Travels: X ~ 1,000 mm, Y ~ 800–900 mm, Z ~ 810–1,000 mm
- Table / pallet size: 630 × 630 mm, two pallets (or pallet change)
- Max part / pallet load: up to ~1,200 kg (depending on variant)
- Spindle: BT-50 taper, 6,000 rpm (in many configurations)
- Tool magazine / ATC: commonly 60 positions in many used listings
- Control: Okuma OSP series (E100, P100, P200, etc.) depending on build year / variant
- Weight / size: machine is heavy (20+ tons) and large footprint — many listings show dimensions (approx. length ~ 6,800 mm, width ~ 3,380 mm, height ~ 3,200 mm)
- “Space Center” variant: some MA-600HBs are sold in “Space Center” configuration (i.e. heavy-duty, more automation, more robust components)
From user feedback / forums:
- Tool magazine / door locking issues: Some users report the magazine doors failing to lock properly, causing “door unlocked” errors mid-cycle.
- Spindle temperature sensor failures: Some users replaced faulty spindle temperature sensors under warranty.
- Swarf accumulation inside “horizontal” surfaces: Because of the geometry of horizontal machines, swarf / chips tend to accumulate in interior, low-angle surfaces, which can cause maintenance headaches if not cleaned out regularly.
- APC / pallet drive gearbox wear / replacement: Users report needing to replace the gearbox in the pallet change mechanism, particularly when pallets or loads are near the limits.
- Cables / feedback / inductosyn / encoder cable failures: One user reported a fractured cable in the B-axis Inductosyn system (positional feedback) — tricky and subtle fault to track.
These known “pain points” can help focus your inspection.
Pre-Purchase / Remote Due Diligence
Before visiting, do as much intelligence gathering as possible. These steps help you filter out high-risk machines and arrive better prepared.
- Request full machine history & documentation
- Maintenance logs, service / repair records, breakdown history
- OEM manuals, mechanical and electrical drawings, schematics, wiring diagrams
- Original control parameter backup files, offsets, tool tables
- Any retrofits, upgrades, or modifications (especially to control, drive systems, or structure)
- Records of major overhauls: spindle rebuilds, pallet change mechanism rebuilds
- Confirm configuration & variant
- Confirm exact model / variant (e.g. standard vs “Space Center”)
- Check control type (OSP E100, P100, P200, etc.), firmware version
- Ask which options are installed: coolant-through-spindle, 4th axis / rotary table, automation, probe, tool monitoring, additional pallet stations
- Confirm the number of pallets, tool magazine capacity, pallet load capacity
- Ask for high-resolution photos / videos
- Exterior: frame, base, covers
- Interior: underside, chip collection zones, ways, rails
- Tool magazine, pallet changer, magazine doors
- Spindle sections, tool holders, taper area
- Electrical cabinet interiors, wiring, PCB boards
- Video of machine under power: axis motion, tool change, pallet change, spindle running
- Ask targeted operational questions
- Total operational hours, cutting hours vs idle
- Material types / workloads run
- Any known recurring faults, alarms, or “weak spots”
- Crash / collision history
- Reason for sale
- Whether a “trial run / acceptance test” after installation is permitted
- Whether tooling / spare parts are included
- Check spare part & support availability
- Are critical spares (spindle bearings, pallet drive parts, encoder modules, magazine door locks, special sensors) still available (in your country / region)?
- Is the control version still supported by Okuma or third-party spares houses?
- Are automation / pallet / tool systems from original OEM still maintainable?
- Logistics & site readiness
- Ensure your facility can handle the machine’s weight, footprint, and need for foundation / anchoring
- Check crane / rigging access, overhead clearance, disassembly / transportation constraints
- Confirm your electrical supply (voltage, phase, frequency) is compatible or plan for appropriate conversions
- Plan for coolant, lubrication, chip removal, ventilation, and space for maintenance access
On-Site / Physical Inspection Checklist
When you or your trusted expert get to the site, work through a systematic evaluation by subsystem. Document everything carefully, take your own measurements, photos, and notes.
1. Structural / Frame / Base / Alignment
- Look for cracks, weld repairs, distortions, damage in the base, frames, pillars
- Inspect surfaces for corrosion, pitting, rust especially in interior / hidden zones
- Check flatness of base surfaces & alignment of guideways
- Inspect mounting / anchoring points for signs of shifting or settling
- Check whether the machine was relocated (moved) often — that can introduce alignment issues
2. Guideways, Linear Rails, Box Ways / Slides
- Jog axis motions (X, Y, Z) smoothly through travel; listen / feel for binding, stiction, unevenness, jerkiness
- Reverse direction, measure backlash / lost motion with precision dial indicators or laser methods
- Visually inspect guide surfaces for scoring, gouges, wear lines
- Check for proper lubrication (oilers, guards, lines) and functioning lubrication system
- Remove covers / guards to see underside / hidden surfaces for surface degradation, contamination, debris
3. Ball Screws / Leads / Nuts / Couplings
- Examine ballscrews / leads for wear, pitting, chatter marks
- Jog to near or at travel ends and check for increased play
- Inspect couplings (flexible couplers, alignment, end support)
- Check for overloaded compensation (if the machine uses backlash or servo compensation)
4. Spindle & Tool Holding System
- Run the spindle at multiple speeds; listen for hum, grinding, irregular noise
- After running, let it sit and check for excessive heat in spindle housing
- Use precision dial indicators to measure radial and axial runout at the tool nose
- Inspect the taper area / tool holding interface for wear, marks, damage
- Ask whether spindle bearings have been replaced or serviced
- If coolant-through-spindle is installed, test seal integrity and pressure handling
5. Tool Magazine / ATC / Magazine Doors
- Cycle the tool magazine thoroughly (indexing, tool changes) — test speed, smoothness, repeatability
- Check magazine door locks / interlocks — user reports suggest door locking issues on some MA machines.
- Inspect magazine drums, indexing mechanisms, sensors, and relays
- Look at the interface between magazine and turret / spindle for alignment and fit
6. Pallet / APC / Pallet Changer / Table
- Test pallet change operation through all cycles (load, index, change)
- Check for smoothness, speed consistency, and alignment repeatability
- Inspect the pallet drive gearbox, index mechanisms, rails, rollers — these are known weak points in some units.
- Inspect pallet surfaces, clamp systems, sensors, and mechanical interface
- Check for wear, damage, or misalignment in pallet indexing
7. Control, Cabling & Electronics
- Power up control: check for alarms, missing modules, memory issues
- Test operator panel: keys, mode switches, display, jog buttons, overrides
- Run a simple program with axis motion, spindle rotation, tool change & pallet change
- Check file transfer (USB, network, DNC)
- Open the electrical cabinet: look for dust, corrosion, burn marks, wiring modifications
- Inspect boards, relays, power supplies, connectors, grounding
- Trace critical cables (e.g. feedback / encoder / inductosyn lines) for wear, damage
- Be especially mindful of feedback cable systems for axes, as some users reported faults in cable to inductosyn B-axis modules.
8. Chip Removal / Swarf Management
- Inspect chip ejection paths; test the chip conveyor (if present)
- Examine “horizontal surfaces” inside for swarf build-up; one user notes that swarf tends to collect in horizontal or low-angle surfaces in the machine interior.
- Check for clogged channels, restricted flow, and ease of cleaning
- Inspect coolant system, sump, filters, screens, coolant pumps, pipes
9. Test Machining / Accuracy / Repeatability
- Run representative parts / geometries (face milling, long cuts, boring, drilling)
- Measure parts for dimensional accuracy, tolerance adherence, surface finish
- Repeat the same part multiple times to test repeatability
- Run longer cycles to allow thermal effect and check drift or dimensional changes
- Test near extremes of travel to see performance across full envelope
- Verify alignment of axes, squareness, and interfacing tolerances
10. Evidence of Crash / Damage / Abuse
- Look for fresh welds, repainted sections, patched areas (which might hide prior damage)
- Inspect for misaligned parts, bent frames, or stress zones near turrets, pallets, columns
- Ask explicitly about collisions, emergency stops, overload events
- Be cautious if the machine looks “too pristine” — cosmetic touches may obscure mechanical wear
Red Flags / Deal Killers
Some issues, if found, should heavily discount the machine (unless the price is commensurately low and you have a repair plan):
- Severe guideway / slide / base wear that cannot be reconditioned
- Spindle damage (bearing issues, worn or damaged taper)
- Tool magazine door locking faults or repeated lock/unlock failures
- Pallet changer / APC drive gearbox in poor condition
- Obsolete / unsupported control version or missing critical control modules
- Excessive signs of internal damage, crash repairs, structural damage
- Missing critical parts (tooling, pallets, magazine components)
- Electronics / wiring modifications with poor craftsmanship or undocumented changes
- Evidence of long-term neglect (oil sludge, dirty coolant, lack of maintenance)
- Cable / feedback system faults in critical axes
Negotiation & Contract Considerations
- Use inspection findings to negotiate down for parts or deficiencies
- Require the seller to bear or share transport, disassembly, rigging, reassembly costs
- Insist on an acceptance / test-run period (e.g. 1–2 weeks) after installation, during which you verify machine performance
- Hold back part of payment until acceptance is successful
- Ask for spares / tooling as part of the deal
- Include clauses for corrections if the machine fails predefined promises (e.g. repeatability, accuracy)
Post-Installation / Commissioning Checklist
Once the machine is in your shop, do a rigorous commissioning and validation routine:
- Leveling, anchoring, and alignment to foundation, verifying base geometry
- Clean / flush lubrication and coolant systems; replace filters and top off fluids
- Run break-in cycles: idle, light load, then full load
- Re-run your pre-purchase test cuts & measurements; compare results
- Monitor for thermal drift, dimensional stability, alarm behavior over extended run hours
- Keep a spare kit of critical parts (belts, seals, sensors, electronics modules, magazine spares)
- Establish a preventive maintenance schedule (lubrication, filter changes, inspections)
- Document all settings, offsets, parameter backups, and make sure backups are stored offsite