Avoid Costly Mistakes: Professional Tips for Purchasing a Pre-Owned / Surplus / Second-Hand / used Haas ST-10 made in USA
Buying a used Haas ST-10 lathe can be a good deal — but only if you’re extremely careful. The ST-series lathes have advantages (good support, parts availability, solid baseline design), but used machines often hide defects, wear, or previous damage. Below is a “best practices / red flags” guide that seasoned buyers use to avoid costly mistakes.
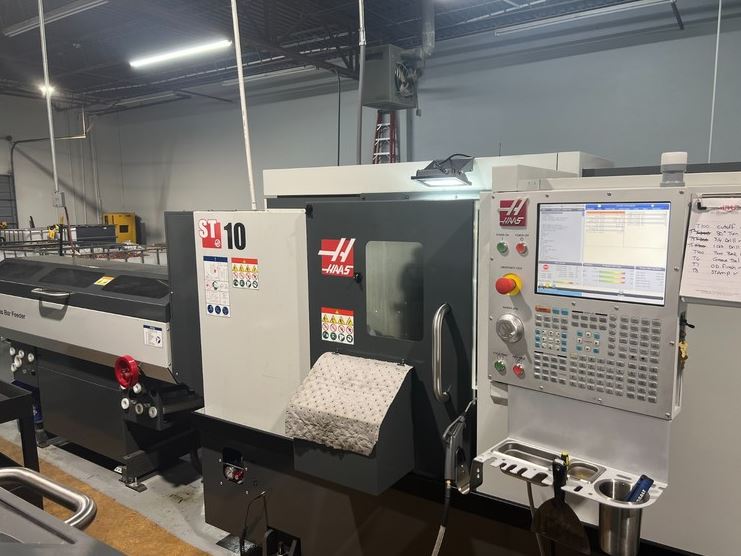
Why the ST-10 presents both opportunity — and risk
Some advantages:
- Haas is a well-known brand; parts, control modules, support are (relatively) more accessible than “no name” machines.
- The ST-10 is a small/medium lathe; shipping, handling, and floor space requirements are more manageable than large lathes.
- Many users report good performance — though issues do arise. E.g. chatter when boring, drift or tool offset changes.
But the risks are real:
- Wear (ways, ball screws, turrets, spindle bearings) can degrade performance severely.
- Crash history may not always be disclosed; evidence may be hidden.
- Modifications or undocumented repairs can complicate diagnostics and future maintenance.
- Even with a reputable brand, the control, electronics, or replacement parts might be less usable (if obsolete or poorly maintained).
So you must treat a used ST-10 as a “complex asset” — inspect deeply, negotiate hard, preserve rights to reject or adjust.
Pre-Purchase / Remote Due Diligence Steps
Before you visit the machine, do as much groundwork as possible.
- Ask for full documentation / history
- Maintenance logs, repair history, parts replaced, crash incidents
- Original manuals, wiring diagrams, parts lists, control parameter listings
- Control software backups, offsets, tool tables
- Any modifications or field upgrades
- Verify the exact configuration
- Confirm it’s exactly ST-10 (serial number, build year) and not a variant.
- Ask which options are installed (e.g. live tooling, bar feeder, sub-spindle, sealed ways, coolant systems).
- Find out which version of Haas control (Classic, Next Generation, etc.) — and whether the control and I/O boards are still supported in your region.
- Check parts & service availability locally
- How easy (or costly) will it be to obtain common wear parts (ball screws, bearings, servo drives, encoders, control boards)?
- Are there Haas Factory Outlets or authorized service partners in your country / region?
- Are replacement turrets, turret parts, or tool changer components still available?
- Request high-quality media in advance
- Photos (high resolution) of bed, ways, turret, spindle nose, electrical cabinet, underside, wiring, covers.
- Video of power-up, axes motion (X, Z), spindle at various speeds, turret indexing, tool changes.
- Video of a “live test run” (simple machining) if possible.
- Ask probing operational questions
- What is the total runtime / cutting hours?
- What materials and part geometries were typically machined?
- Has the machine had crashes or tool collisions?
- Are there any known problems (vibration, chatter, drift, errors, alarms)?
- Why is the seller selling it?
- Are any spare parts or tooling included?
- Is there an acceptance / test-run window post-installation?
- Plan logistics, site readiness & costs
- Ensure your floor and foundation can support the weight and footprint
- Check crane / rigging access, disassembly / reassembly constraints
- Confirm your electrical supply (voltage, phase, frequency) matches or can be converted
- Plan coolant, filtration, chip removal, and environmental control
On-Site / Physical Inspection Checklist
When you or your inspector arrive, go through a methodical inspection by subsystem. Use this as your checklist.
1. Structural & Frame
- Examine machine frame, base, columns, covers for cracks, weld repairs, distortion, alignment issues
- Look for signs of collision or repair (e.g., repainted spots, fresh welds)
- Check for rust, corrosion, pitting
- Verify bed flatness and alignment of the ways relative to each other
2. Ways, Slides, and Way Covers
- Jog axes (X, Z) over full travel at various speeds; feel for binding, roughness, stiction
- Reverse direction and check for backlash / lost motion
- Visually inspect guide surfaces / ways for scoring, wear marks, gouges
- Check the way lubrication / slide lubrication system: are oilers, lines, wicks functional?
- Remove way covers and check cleanliness, chips, adhesives, foreign debris
3. Ball Screws / Leads / Nuts / Couplings
- Examine ball screws / lead screws for signs of wear, pitting, chatter marks
- Jog axes to ends of travel and see if play / looseness increases
- Check coupling alignment, flexible couplings, motor couplings
- Ask to view compensation parameters — how much correction is being applied (if the machine has backlash compensation)
4. Spindle & Bearings
- Run spindle at multiple speeds; listen carefully for unusual noises (grinding, hum, buzz)
- After extended run, check how hot the spindle housing becomes
- Use a dial indicator to measure radial & axial runout at nose
- Inspect taper or tool-holder interface for wear
- Ask if spindle bearings have ever been replaced or rebuilt
5. Turret / Tool Changer / Indexing Mechanism
- Cycle the turret many times: index, clamp / unclamp, tool change motions
- Look for any clamping/alarm faults; test for smoothness
- Inspect turret drive mechanism, solenoids, pneumatic / hydraulic actuators
- Reference Haas’s troubleshooting guide for the ST-10 turret indexer.
- Check for misalignment (e.g. tool nose point not concentric) — one user reported a crash knocked turret alignment by 0.015″
6. Control & Electronics
- Power up the CNC; look for alarms, error codes, missing modules
- Test all operator controls (keys, touch screen, override dials, mode switches)
- Run a simple program / axis motion test
- Test I/O operations, file transfer (USB, ethernet, DNC connectivity)
- Inspect inside the electrical cabinet: check for dust, burn marks, wiring modifications, cleanliness
- Check relays, contactors, power supplies, cooling fans, circuit boards
- Verify grounding and shielding
7. Cooling, Chips, Auxiliary Systems
- Check coolant system: pump, lines, filtration, nozzles, screens
- Inspect chip conveyor (if present) for functional movement and wear
- Inspect coolant tank condition (clean, sludge, contamination)
- Look for auxiliary systems (air blow-off, mist, filtration) and test them
8. Tailstock (if equipped)
- Test the tailstock movement and clamping
- There is a known issue: the ST-10/15 tailstock can sometimes “stick” or bind; Haas even provides a troubleshooting video for this.
- Check for smoothness, play, alignment
9. Test Cut / Cut Performance / Accuracy
- Perform a test machining cycle (turning, facing, boring) using representative material
- Measure finished part dimensions (OD, ID, length, straightness, roundness)
- Execute repeated cuts to test repeatability
- Run longer cycles to let the machine heat up; measure drift or dimensional change
- Test max travel positions to check linearity
10. Crash / Damage Evidence & Red Flags
- Look for fresh welds, repaint in odd zones, repairs under covers
- Inspect for bent or misaligned parts, especially turret, cross slide, carriage
- Ask if the machine ever had crashes or emergency stops
- Be cautious of machines that look “too clean” — sometimes appearance is used to mask problems
Common Issues / “Gotchas” with Used ST-10 Machines
From user forums and service bulletins, here are specific pitfalls seen in real ST-10 units:
- Turret / clamping alarm errors — after crashes or tool overreach, turret might rotate but not clamp, causing alarms (e.g. alarm 113)
- Chatter while boring or internal machining — some users report high-frequency chatter that was hard to remedy, even after replacement of spindle or drive components
- Tool probe / offset drift — some users observed that size changes (0.1 mm or similar) would occur even without changing the part, possibly indicating stability or compensation issues
- Tailstock sticking — the tailstock sometimes binds, especially if hydraulic or lubrication issues exist; the official Haas video addresses this.
- Turret misalignment — even a minor turret misalignment (rotational offset) can degrade part accuracy and tool changes. The force of a crash can knock the turret alignment.
These issues highlight the importance of verifying turret alignment, test cuts, and tool change repeatability. Don’t assume users’ claims are fully truthful — test everything.
Negotiation & Contract Strategies
- Use your inspection findings (wear, alignment drift, tool change inconsistencies) as leverage in price negotiation
- Require the seller to bear rigging, disassembly, shipping, and reassembly (or at least share) costs
- Insist upon a post-installation acceptance / test-run period (e.g. 1–2 weeks) during which you can verify performance
- Hold back a portion of payment until after successful commissioning
- Request spare parts or tooling be included (or discounted)
- Include in the contract responsibilities for warranty or “as-is” conditions, clarifying what you will accept
Post-Installation / Commissioning Checklist
Once the machine is installed on your floor:
- Leveling, alignment, geometry checks — use precision instruments to confirm baseline geometry
- Clean / flush lubrication and cooling systems, replace filters, top up fluids
- Run break-in cycles (idle, light load, then full load)
- Re-run test cuts / accuracy tests done earlier; compare results
- Measure drift and thermal stability over time / shifts
- Monitor alarms, sensor behavior, bending or offsets
- Keep a spare kit of critical parts (seals, filters, electronics modules, turret components)
- Set up a detailed preventive maintenance schedule & log records