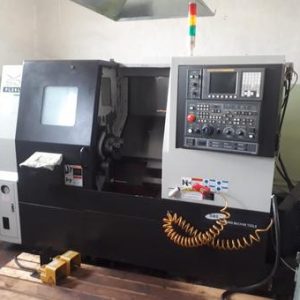
Avoid Costly Mistakes: Professional Tips for Purchasing a Pre-Owned / Surplus / Second-Hand / used Makino EDNC 15 Sinker EDM made in Japan
When buying a used Makino EDNC-15 (or similar Makino sinker / ram EDM), the risks are high—EDM machines combine high precision, delicate electronics, power supply systems, and fluid systems. Below is a detailed “red flag checklist” and professional tips to help you avoid costly mistakes.
What “Good / Healthy” Looks Like — Benchmark Specs & Design Reference
Before you inspect, you need to know what the “ideal” Makino EDNC-15 offers, so you can spot exaggerations or hidden depreciation. From Makino’s published data:
- The EDNC-15 is part of Makino’s EDNC Series of sinker (ram) EDM machines.
- Key specs include:
• Travel (X / Y / Z): 1,500 × 700 × 500 mm (standard)
• Optional extended Z to 800 mm in some configurations (HS-Rib jump capability)
• Rapid traverse / jump (non-cut) speeds: up to 5,000 mm/min
• Maximum workpiece weight: 10,000 kg (22,000 lbs)
• ATC (automatic tool changer) options: 8, 16, or 32 station
• Dielectric tank size: 2,500 × 1,400 × 800 mm (as built into base cast)
• Max electrode weight: 100 kg
- Design features to watch:
* Stationary worktable, moving head (ram) design improves stability under heavy part loads.
* Integrated dielectric reservoir built into the machine base (to reduce thermal distortion)
* The EDNC series supports Makino’s “Hyper-i” control environment, SuperSpark / HyperCut / HS-Rib jump modes etc.
Use these as your benchmark. If a seller claims a much larger travel, faster jump speeds, higher electrode weight, or much heavier parts capacity without documentation, be skeptical.
Inspection & Evaluation Checklist
Divide your inspection into mechanical / structural, electrical / power / control, EDM specific subsystems, and functional / test runs. Each area hides potential showstoppers.
1. Documentation & Pre-Screening
Before arriving, request:
- Machine serial number, manufacturing year, machine build sheet, any retrofits or rebuilds
- As-built manuals, mechanical & electrical schematics, parts lists, wiring diagrams, maintenance logs
- Control / CNC (Hyper-i or predecessor) manuals, backup software, parameter sets, macros
- Past alignment / calibration / metrology reports
- Usage history: hours on power, hours in cutting/erosion, duty cycles, electrode materials used, shock events
- Photos/videos (or remote demo) of the machine in motion (ram, X, Y movement, tool change, dielectric flushing)
- Spare parts availability (power modules, transformers, servo drives, capacitors, dielectric pumps, electrode holders)
- Transport / logistic data: machine footprint, weight, lifting points, required clearance
If the seller cannot provide credible documentation or refuses motion or test videos, treat that as a strong warning.
2. Structural & Mechanical / Motion Subsystems
These are among the hardest (and most expensive) to fix.
a) Frame, base & casting integrity
- Visually inspect for cracks, welds, repairs in the base, casting walls, head housing, columns
- Check for distortion in the casting—bending, sagging, or “twist” in major reference surfaces
- Verify that mounting surfaces, tank floor, and table support plane are flat and not warped
b) Ram (head) guides / linear ways / slide surfaces
- Move the ram (Z direction) slowly and feel for uneven friction, binding, stick/slip zones
- If possible, retract and extend the ram many times and observe consistency in motion
- Inspect guide surfaces (linear rails, guide bars, sliders) for scoring, pitting, corrosion, or wear flats
- Check that wipers, scrapers, dust shields or covers (if present) are intact—if they are missing or damaged, debris may have damaged the guides
- Inspect adjustment / preload systems (if the machine has adjustable guide preload, shims, or alignment screws)
c) X / Y axes (table motion) & reciprocal travel
- Jog the head in X / Y to ensure the full envelope is reachable with smooth motion
- Feel for any areas in X / Y where motion becomes stiff or changes friction — that may indicate localized wear or debris
- Check coupling / drives of X / Y axes (ballscrews, servo motors, guides) for looseness or play
d) Worktable, fixture mounts, and tank
- Inspect the worktable top: flatness, mounting holes, wear in fixture areas
- Check how rigidly the fixture mounts — any looseness or wear in the mount points can degrade accuracy
- Inspect the dielectric tank and its integration: tank walls, floor, seals, drains, structural support
3. Electrical / Power / Control / Generator
This is often the “deal breaker” area for used EDM machines.
a) Power supply / generator systems
- Identify the EDM generator (power modules, capacitor banks, high-voltage circuits). Note their condition.
- Inspect high-voltage cables, connectors, insulation condition, porcelain bushings, dielectric feed-throughs.
- Check for signs of arcing, scorch marks, carbon tracking, or insulator breakdown
- Verify the cooling / chiller / transformer systems are functional and consistent (voltage stability, cooling fluid circulation)
b) Control / CNC / Hyper-i or predecessor control system
- Power-up slowly, monitoring for abnormal currents, blown fuses, or electrical smoke
- Examine wiring harness enclosures, terminal blocks, cable routing, cable insulation, repair splices
- Boot the control, navigate the UI, verify parameter sets, view alarms / error logs
- Jog X / Y / Z axes via control, check response, smoothness, reactivity
- Test synchronization (if any multi-axis moves)
- Verify limit switches, reference / home sensors, safety interlocks, E-stops
- Inspect position feedback sensors (linear encoders, resolvers if used) — ensure stable signal, no missed counts or noise
4. EDM-Specific Subsystems & Fluid / Filtration / Electrode Handling
These are unique to EDM and often sources of hidden failures.
a) Dielectric fluid system, pumps, filtration & filtration lines
- Verify dielectric pump(s), pressure stability, plumbing integrity, valves, flow sensors
- Inspect filters, filter media, filter housings, clogging, bypass lines
- Check condition of dielectric fluid—may be contaminated with particles, sludge, or conductive debris
- Ensure all piping, flexible hoses, seals, flanges are intact with no leaks or brittle deterioration
b) Electrode handling / ATC system (if equipped)
- Cycle the ATC / electrode changer (if present) many times; check for mis-indexing, slowness, error during pick/place
- Inspect tool holders, holders for electrode seating, chucking force, alignment repeatability
- Check any electrode length measurement / touch-off systems for accuracy and consistency
c) Dielectric tank, rise/fall tank motion, tank integrity
- Some EDNC machines have a programmable rise/fall work tank design (moving tank up/down) — test that function: smoothness, speed, repeatability
- Inspect the tank walls, seals, floor, structural supports for corrosion, wear or leakage
- Check fluid level sensors, overflow protection, drains, and return plumbing
d) Z-axis jump / HS-Rib functionality (if applicable)
- If the machine has a high-speed jump Z-axis (HS-Rib) option, test its jump motion (non-cut) and compare to spec
- Check how well the system handles debris clearance during jump and its stability
5. Functional / Cutting / Erosion Test & Acceptance Trials
This is the acid test. You must see actual EDM operation.
- Bring or request a test electrode, workpiece (conductive), dielectric, and run a typical pocket / cavity program
- Execute full-cut tests: roughing, finishing, dwell, electrode retraction, overcut, spark control
- Verify accuracy of electrode depth, spark behavior (stability, no arcs), pocket geometry, surface finish
- Perform return-to-zero, repeatability across axes, measure drift over repeated passes
- Run continuous cycles for several hours to test stability, cooling, drift, thermal effects
- Interrupt and resume, change electrode mid-program (if possible) and see consistency
- Test high-speed Z jump (if equipped) under real conditions
- Test full electrode tool-change / ATC operation under load
If the seller refuses EDM tests or only allows dry motions, that is a major red flag.
6. Geometry, Calibration & Precision Evaluation
Even well-maintained EDMs can drift in geometry over time. You must verify the machine is still serviceable.
- Acquire or perform calibration / alignment data (laser, dial indicator sweeps, test blocks)
- Check:
• Straightness in X, Y, Z axes
• Squareness between axes
• Repeatability (return-to-position) across full envelope
• Electrode placement accuracy, drift with depth
• Gap stability, spark centering accuracy
- Check whether the control supports compensation maps or geometric correction, and whether those maps are valid
- Estimate whether misalignment / drift is correctable (mechanically or by software compensation)
7. Spare Parts, Serviceability & Long-Term Support
A used EDM is only as good as your ability to repair or maintain it.
- Confirm that critical spares are still available: power modules, capacitors, HV cables, dielectric pumps, chiller units, filters, motion drives, sensors
- Check whether Makino (or authorized service) supports EDNC in your region
- Identify local EDM service shops that can repair high-voltage components, power supplies, wiring
- Evaluate possibility of retrofitting newer control modules / drives if native ones become obsolete
- Ensure electrode tooling, holders, adapters, supplies remain available
- Try to acquire spare consumables (filters, spare pumps, filters, electrode holders) as part of the purchase
8. Contractual Safeguards & Risk Mitigation
Even with a perfect inspection, hidden issues can emerge later. Protect yourself contractually.
- Insist on conditional / performance-based acceptance: final payment only after the machine passes your EDM test runs
- Define quantitative acceptance criteria: dimensional tolerance, surface finish, drift limits, spark stability, repeatability
- Negotiate a warranty / guarantee period (e.g. 30–90 days) covering major systems (power modules, control, motion)
- Require all documentation (electrical / mechanical schematics, backup software, calibration data, parts lists) to be delivered
- Clarify responsibilities for transport, rigging, leveling, installation, alignment, commissioning
- Insert “burn-in / commissioning period” clause: defects found under initial use must be remediated by seller
- Demand written disclosures of known damage, past repairs, power supply rework, or accidents
9. Transport, Installation & Commissioning Considerations
Even excellent equipment can be damaged or misaligned in transit or poor setup.
- Confirm actual machine weight, footprint, required disassembly, and lifting points
- During move, use proper rigging, shock protection, structural bracing to avoid twist / stress
- After installation: re-level carefully, anchor or base-mount support without over-constraining
- Allow a robust commissioning / break-in period under real EDM loads
- After the machine settles, re-check geometry, drift, repeatability, spark stability
- Be present (or have your engineer) during first production jobs to monitor performance and catch issues early
10. Red Flags & Deal-Breaker Conditions
If you see several of these, walk away or demand extremely favorable pricing + guarantees:
- Seller refuses full inspection, internal access, or real EDM test runs
- Visible repairs, burns, cracks, or modifications in frame, high-voltage lines, tank, casting
- Broken or missing dielectric tubing, insulator cracks, cable insulation damage, arcing signs
- Power modules / capacitors with burn marks, scorch, or signs of overheating
- Worn / damaged motion guides with scoring, pitting, or heavy wear
- ATC / electrode changer mis-indexing, slow, error-prone
- Flushing or filtration system in disrepair, leaks, clogging
- Control boards or power electronics obsolete or no longer serviceable
- Wiring harnesses with brittle insulation, many splices, patch repairs, signs of overheating
- Missing critical documentation (electrical schematics, control backup, calibration data)
- Spare parts for power modules, capacitor bank, drive electronics are no longer available or too expensive
- Geometry so degraded (drift, misalignment) that correction would cost more than replacement