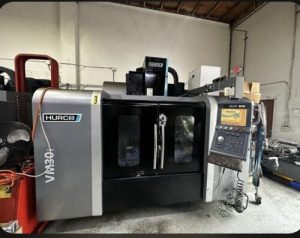
Avoid Costly Mistakes: Professional Tips for Purchasing a Pre-Owned, Surplus, Second-Hand, Used HURCO VMX42i CNC Vertical Machining Center made in Germany
Here’s a deep-dive “what to watch for / avoid / insist on” guide when buying a used / surplus HURCO VMX42i (vertical machining center). Because the VMX42i is a premium midsize machine, many hidden defects can kill performance or reliability. Use this as your on-site (or remote video) inspection and negotiation toolkit.
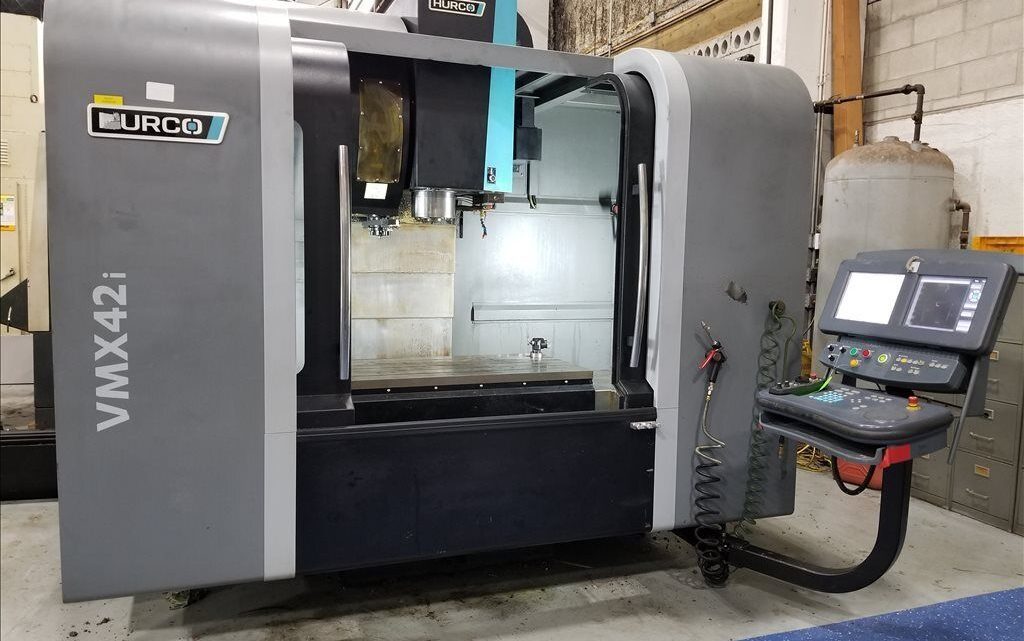
Key Specifications & Baseline Expectations
First, knowing the gold standard specs gives you a benchmark to judge what “good enough” means versus “problematic.” For the VMX42i:
- Travels (X × Y × Z): 1067 × 610 × 610 mm
- Table size: 1,270 × 610 mm
- Max weight on table: ~1,750 kg
- Spindle: up to 12,000 rpm
- Spindle drive: 18 kW peak (1 min rating)
- Tool changer: 30 or 40 stations (CAT or BT 40)
- Rapid traverse rates: ~38 / 38 / 32 m/min in X / Y / Z
So when you inspect a used machine, anything significantly worse than these numbers is a red flag or needs strong justification.
From used-machine listings, one example shows a 2019 VMX42i with “42″ × 24″ × 24″ (≈ 1,066 × 610 × 610 mm), 12,000 rpm, 30 ATC” configuration.
Another used listing for a VMX42 (closely related family) shows similar travel, table, spindle and tool changer specs.
Knowing these baseline spec targets helps you spot machines that are under-equipped, downgraded, or worn beyond acceptable limits.
What to Inspect / Test — Detailed Subsystem Checklist
Here is a systematic “red-flag detection” checklist (with examples of what issues to look for):
| Subsystem / Area | What to Check / Test | Risks & Failure Modes | Red Flags / Deal-Breakers |
|---|---|---|---|
| Machine History, Documentation & Serial Info | • Ask for full maintenance logs, repair history, upgrades, rebuilds. • Request original alignment certificates, calibration records. • Get the machine’s serial number, option list, control version, retrofit history. • Ask whether any major repairs (spindle rebuild, ballscrew replacement, control replacement) have been done and when. | Sellers sometimes “paper over” repeated issues. A controller retrofit or spindle rebuild can mask deeper mechanical problems. | No documentation, missing retrofit history, unexplained frame repairs, or mismatch between paperwork and the machine’s condition are serious concerns. |
| Spindle & Spindle Drive / Bearing Integrity | • Run the spindle across its full rpm range (low → high → low) and listen for noise, vibration, or heating. • Test under load (if possible) to see how it handles torque and stability. • Use a test bar or indicator to measure spindle runout, taper wear, and repeatability. • Inspect spindle internal lubrication, seals, coolant passages, and check for leakage or contamination. • Ask when/whether the spindle was rebuilt or bearings replaced. | Worn or damaged spindle bearings or taper wear will degrade surface finish, increase tool wear, and reduce precision—repairing spindles is expensive. | Excessive runout, noise, vibration, overheating, leakage, or unwillingness to disclose rebuild history are red flags. |
| Linear Axes / Ballscrews / Guideways / Slides | • Jog each axis through full travel in both directions, listening for grumbles, stiction, or speed-dependent anomalies. • Rapid traverse and full-speed moves to check smoothness and acceleration behavior. • Reverse direction quickly (full forward to full reverse) to detect backlash “kicks.” • With covers removed (if allowed), visually inspect guideways, recirculating bearing surfaces, gibs, lubrication lines, and look for scoring, rust, wear, or chips embedded in ways. • Check accuracy of feedback (linear encoders, scales) versus commanded movement. • Check limit switches, homing behavior, and limit sensor consistency. | Worn ballscrews, faulty recirculation, guideway wear or misalignment cause poor accuracy, backlash, chatter, and degraded performance. | Binding, jerky motion, audible knocks, excessive backlash, visible scoring or way damage, or servo alarms in axis drives indicate serious issues. |
| Tool Changer (ATC) & Tool Holding System | • Cycle the tool changer through full magazine operations including tool swaps under various loads. • Inspect pockets, grippers, tool clamp mechanisms, actuator motors, and sensors. • Check repeatability of tool positioning, sensor feedback, and mechanical integrity. • With a tool loaded, perform a test cut or run a small program to see if tool change introduces error or delay. | A malfunctioning ATC can cause mis-indexing, tool crash, or downtime. | The ATC failing to index cleanly, tool pockets mis-seating, sensor or motor failures, or visible wear in grippers are red flags. |
| Coolant / Lubrication / Hydraulic / Pneumatics | • Inspect coolant systems: pumps, filters, piping, seals, pressure/flow gauges. • Run coolant (or internal coolant, if present) to check full flow, pressure, cleanliness, and functionality. • Check lubricant / grease / oil supply systems: automatic lubrication, pumps, lines, valves. • Inspect hydraulic or pneumatic systems (if used for chucking or actuation) under load. | Inadequate coolant or lubrication leads to accelerated wear, heat distortion, or catastrophic failure. | Low or inconsistent pressure, leaks, clogged filters, inoperative lubrication system, or dirty / contaminated coolant are danger signs. |
| Electrical / Control / Drives / Wiring | • Power up the control; note start-up behavior, alarm history, LED statuses on drives and modules. • Inspect control cabinet internals: boards, capacitors, wiring, connectors, signs of overheating, smoke, patch wiring, corrosion. • Check servo drives, spindle drives, I/O modules for errors or fault history. • Test limit switches, emergency stop, interlocks, and I/O functions. • Upload / download a program, check control communication ports, test software integrity. • Check control version, firmware, any locked features, or option status. | Faulty or obsolete electronics may be impossible or extremely expensive to replace. | Burnt boards, flaky wiring, past “field fixes,” control module errors, or missing option licenses are major red flags. |
| Thermal Stability & Drift | • Let the machine warm up under idle or light motion for 30–60 minutes, then measure geometry or positioning drift. • Check whether the machine’s thermal compensation (if present) functions and whether it brings results within spec. • Re-check key reference points (e.g. distances, alignments) after hours of operation to see how much drift occurs. | Thermal expansion, drift, and instability reduce achievable tolerances, especially for molds or precision parts. | If drift is excessive (beyond what the manufacturer would permit) or compensation is non-functional, that is a serious performance risk. |
| Geometric Accuracy / Metrology Tests | • Before cutting: mount a test artifact (block, cylinder) and measure for flatness, perpendicularity, squareness, runout, etc. • After cuts: produce a test part (e.g. a square / round “NASA test piece,” stepped features) to evaluate real-world accuracy. • Use dial indicators, gauge blocks, or portable coordinate measuring equipment (if available). • Check for consistency across different positions of the table and over different axes. | A machine that cannot maintain geometry under load or over its work envelope is of limited value. | If measured deviations exceed your required tolerance or factory spec by meaningful margins, that’s a deal-breaker (unless you negotiate price accordingly). |
| Long-Run / Production-Like Testing | • Run a representative part program (or at least a segment) to simulate actual work, for hours if possible. • Observe behavior over time: vibration growth, tool wear, temperature drift, alarms, power draw. • Monitor whether accuracy changes over runtime or cycles. | Some defects only emerge under sustained load or thermal stress. | If instability, drift, tool problems, or alarms arise during longer runs, that reveals deeper issues. |
| Foundation / Base / Leveling / Installation Condition | • Check how the machine is mounted: foundation, anchor bolts, leveling, shims, base flatness. • Ask whether the machine has ever been moved; if so, whether re-surveying / re-leveling was done. • Inspect base for cracks, warpage, welds, surface damage, rust. • Take note of whether alignment pass marks or adjustment shims remain consistent. | A warped or improperly mounted base causes alignment errors, drift, and long rework costs. | A poor base, irregular leveling, or prior damage to the frame is a serious installation risk. |
| Spare Parts, Tooling, Consumables | • Ask what spare parts (bearings, drive modules, sensors, cards) come with the machine. • Check availability and cost of critical parts (especially for older VMX42i components) in your region. • Inspect any included tooling, fixtures, or accessories. • For tool holders, inspect for wear, tolerance, etc. | If a key part fails and no spares are available, downtime or rebuild cost might be extreme. | If the seller cannot provide spares or the parts are obsolete or extremely expensive, reduce valuation heavily or walk. |
| Warranty / Acceptance / Contractual Protection | • Negotiate a short-term warranty (e.g. 30–90 days) for key systems (spindle, drives, control). • Insist on final acceptance after installation in your own facility (not just at seller’s site). • Use a third-party inspector or machine-tool verification service. • Hold back part of payment until full testing is done. • Define “deal-breaker” conditions (e.g. too much backlash, temp drift, control errors) that permit you to reject or renegotiate. | Without recourse, you assume all hidden defects. | If seller refuses any warranty, rejects independent inspection, or demands full payment up front, that’s a strong red flag. |
| Transport / Dismantling / Reassembly / Alignment Risks | • Request rigging / disassembly drawings, weight specs, lifting points, alignment instructions. • Ask whether the machine has been moved before and whether re-survey was done. • Budget for alignment, leveling, geometry requalification once installed. • Consider shock, alignment shift, or damage during transport. | Poor handling or reassembly can permanently degrade alignment or damage components. | Underestimating transport & re-installation cost is a common and expensive mistake. |
| Obsolescence & Control / Electronics Life-Cycle Risk | • Determine whether the control, drives, and module boards are still supported by HURCO or third-party. • Check firmware version, whether upgrades or patches were applied, and whether the machine has option-locked features. • Ask when critical electronic modules (e.g. servo drives, boards) were last replaced. • Confirm availability of replacements or alternative compatible modules. | If a drive or controller fails and is no longer available, the machine might become unusable. | Evidence of “end-of-life” boards or modules, or code-locked options, is a serious risk. |
Negotiation & Pricing Strategy Tips
- Define your minimum acceptance thresholds (backlash, runout, repeatability) before visiting or bidding. If the machine exceeds them, walk.
- Price deductions for defects / repairs: quantify the cost to fix issues you find (e.g. buying new drives, spindle rebuild, alignment) and subtract from offer.
- Staged payment / holdback: withhold a portion of payment until installation and acceptance in your shop is done.
- Third-party inspection clause: require that an independent inspector review the machine prior to final acceptance.
- Warranty for key subsystems: even a 30- or 60-day warranty on spindle, control, drives gives you recourse if hidden defects emerge.
- Spare parts package: negotiate inclusion (or discount) on critical spares (bearings, control cards, cables).
- Transport / re-installation buffer: always pad your transport/realignment/install cost estimates—unexpected crane work or alignment time often exceed early quotes.
- Future-proof / upgrade path: if the control or electronics are a bit dated, negotiate for software upgrades or module replacements as part of the deal.
- Run under load: insist on a full-load or near-maximum-cut test. Idle runs mask many defects.
Common Pitfalls & Buyer Mistakes (so you don’t fall into the same traps)
- Relying solely on appearance (a shiny exterior doesn’t guarantee internal health).
- Running only light or no-load tests — problems (e.g. spindle instability, drift) often appear only under load or thermal stress.
- Not verifying the control / option license status — many used machines have their advanced features disabled or locked.
- Underestimating the cost and time of reinstallation, alignment, leveling, calibration in your own facility.
- Failing to negotiate recourse or inspection rights — many sellers dump the machine “as is.”
- Overlooking obsolescence of control/electronics — a working machine is worthless if a key board dies and is irreplaceable.
- Ignoring that many used machines are sold because they were underutilized or had chronic problems — “cheap” often conceals hidden costs.
- Failing to test “cold start” behavior — some issues only manifest on first power-up, not when warm.
- Assuming that included tooling, fixturing, or accessories are usable — they may be worn or mismatched.