Avoid Costly Mistakes: Professional Tips for Purchasing a Pre-Owned / Second-Hand / used ZMM CU 1250 RD – Universal / Conventional Lathe?
When considering a used ZMM CU 1250 RD universal / conventional lathe, you’re dealing with a large, heavy, and precision-capable machine. Getting it wrong can cost you a lot in transport, repair, or lost capability. Below are professional tips, warning signs, and negotiation tactics to help you avoid mistakes.
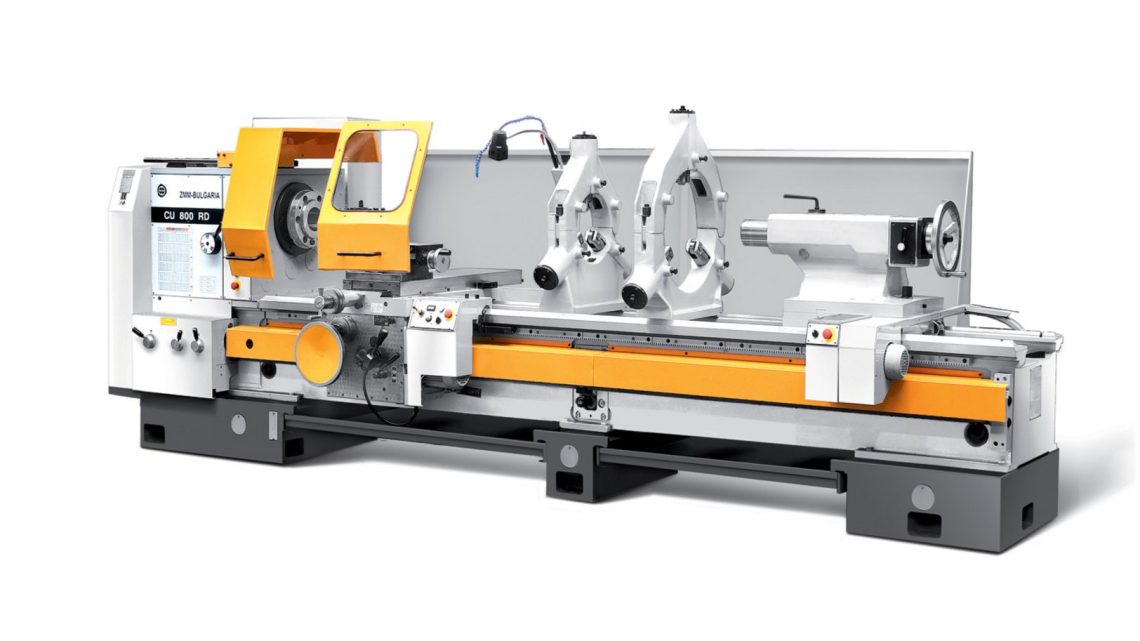
I’ll also include key specs of the CU 1250 RD so you know what “normal” looks like.
0. Baseline: Know the Model’s Key Specifications
Understanding what the original specs are is essential—you’ll use these as your benchmarks (to spot exaggerations or deviations). According to the manufacturer:
- Swing over bed: ~ 1320 mm
- Swing over cross slide: ~ 940 mm
- Center height (distance from bed to spindle center): ~ 625 mm
- Spindle bore: ~ 155 mm
- Distance between centers: offered in variants (1,500 mm, 3,000 mm, up to ~6,000 mm)
- Bed width: ~ 700 mm
- Cross slide travel: ~ 525 mm (in some versions)
- Top slide travel: ~ 270 mm
- Tailstock quill diameter: ~ 125 mm, travel ~ 260 mm
- Spindle speed ranges (gear / stepless) in multiple ranges (4 speed steps etc.)
- Motor power: up to 30 kW in higher spec versions
These numbers give you thresholds—if a listing claims something wildly beyond or far below, it’s a red flag.
1. Documentation & Provenance
Before you even visit the machine, demand evidence:
- Original operation & maintenance manual, parts lists, wiring diagrams. (ZMM publishes manuals for CU 1250RD family)
- Service logs, repair invoices, details of major overhauls (spindles, ways, gearboxes).
- Usage history & application: How intensively was it used? In harsh environments?
- Modifications / retrofits: e.g. added drives, conversions, rewound motors, non-OEM parts.
- What’s included: chucks, faceplates, steady / follow rests, tooling, spare parts, guards, counterweights, change gears.
- Control / readout components if it has digital readouts or CNC attachments—even though it’s “conventional,” many have DRO or electronics.
If seller cannot provide credible documentation, treat with extra skepticism.
2. Visual & Structural Inspection
Walk around the machine carefully before powering anything.
- Examine the bed, bed ways, saddle, cross slide, carriage for signs of wear, gouges, scoring, pitting, or repair (welds, fillings).
- Look at the headstock casting, tailstock, and gap area for cracks, distortions, or prior repairs.
- Check way covers, guards, wipers, protective bellows; damage or missing covers often means internal wear or exposure to chips / coolant.
- Inspect for rust / corrosion on exposed surfaces (ways, slides, screws).
- Check for leaks, oil stains, coolant residue, seepage around headstock, apron, tailstock.
- Ensure all fasteners, panels, electrical enclosures, safety guards are present and intact.
- Look at tool holders, chucks, lathe chuck mounting flange for wear or damage.
Structural problems are the hardest and costliest to fix (replacing castings or straightening).
3. Mechanical & Motion Inspection
Here’s where you find how badly things are worn.
A. Axes / Slides / Ways
- Move the carriage / cross slide manually (or via feed) over its full travel. Feel for tight spots, “flat spots,” or nonuniform motion.
- Use a dial indicator / test bar to check for backlash in the cross slide, carriage, and leadscrew engagement.
- Check for “soft” areas where the slide sticks or moves less freely; this indicates wear or misalignment.
- Listen for squeaks, grinding, metallic contact noise during motion.
- Inspect the leadscrew, feed screw, nut—look for excessive play, pitting, wear.
- Check lubrication: Are oilers, lubricant lines, reservoirs, wipers in place and functional?
B. Headstock / Spindle / Gearbox
- Run the spindle at different speeds (if driven) without load and listen for hum, rubs, vibration.
- Use a test bar or mandrel, mount in spindle, and measure runout (radial and axial) using a dial indicator over full rotation.
- Check the spindle taper or bore for damage, scoring, and how well a mandrel or tool seats.
- Inspect back gear, if present: ensure engagement works cleanly, no slipping or gear tooth wear.
- In machines with multiple ranges or gearboxes, shift through all gear ranges under no load and feel for clunks, binding, or gear mesh issues.
- Check headstock lubrication (bearings, gearboxes) for signs of neglect (lack of oil, sludge, metal contaminants).
C. Tailstock & Quill
- Extend and retract the tailstock quill; it should operate smoothly without binding or play.
- Check alignment of tailstock to headstock spindle centerline (use indicator or test bar).
- Inspect quill for wear, scoring, taper integrity.
- If there is a clamping / locking mechanism, ensure it holds firmly without drift.
D. Apron, Feed Mechanism & Threading
- Shift feeds, test cross and longitudinal feed levers / wheels. See if feed changes are crisp and no excessive play.
- For thread / leadscrew drive (if machine has screw-cutting capabilities), verify the lead / change gear train, ensure the nuts / gears mesh cleanly.
- Check half-nuts (if present) for wear or slip.
- Try engaging automatic feeds (if available) to see if feed is smooth and consistent.
4. Geometric & Accuracy Testing
Even a mechanically “okay” machine can have poor accuracy if alignment or structure is compromised.
- Use a reference surface or straightedge on the bed to inspect flatness & straightness of the bed ways.
- Check headstock / tailstock alignment: mount a test bar, use a dial indicator at various positions, see if centerline deviates or shows taper over length.
- Check parallelism of carriage motion to bed ways (i.e. that carriage moves without tilt).
- Measure perpendicularity / levelness: e.g. after leveling the machine, check whether cross slide is square to bed axis.
- Cut a test straight bar: machine a straight finish pass and measure straightness and diameter consistency at multiple points.
- Check repeatability: retract and return to same position, measure deviation.
- Make test cuts near extremes of travel to see if performance degrades at the ends.
5. Electrical, Power & Auxiliary Systems (If Equipped)
Though the CU 1250 RD is largely conventional, many may have electrical attachments, motors, or readouts.
- If any electrical control, DRO, or digital readout is present, open the panel and inspect for corrosion, loose wiring, burnt components.
- Test any supplied motors (coolant pump, chip conveyor) to see if they run smoothly.
- If there’s a lighting system or other auxiliaries, verify they operate.
- Check for proper grounding, electrical safety compliance (switches, emergency stops).
- If any servo or variable speed drives are present, test at no-load, check for noise, vibration, or fault codes.
6. Hidden / Likely Repair Costs & Risks
Even a lathe that “looks okay” often needs investment. Be realistic about these costs:
- Rebuilding or replacing spindle bearings
- Refurbishing worn bed ways or slideways (resurfacing or scraping)
- Replacing or regrinding leadscrews / nuts / feed screws
- Gearbox repairs, worn gear teeth or shafts
- Tailstock reconditioning, quill repairs
- Alignment, realignment, calibration
- Replacing lubrication systems, wipers, seals
- Electrical or readout system repair or replacement
- Transport, rigging, leveling, foundation work
- Downtime during overhaul
- Sourcing parts: for older or less common models, parts may be harder to find
Because this is a large machine (bed width ~700 mm, heavy castings), even small alignment errors or bed wear can cause significant degradation in accuracy.
7. Negotiation & Deal Structuring to Protect You
You want to avoid being surprised once the machine is in your shop.
- Ask for full inspection access and insist the machine be run under your supervision (axes, spindle, feeds, test cuts).
- Retain a portion of payment until “acceptance” tests are passed.
- Require delivery of all documentation, manuals, backup drawings, part lists.
- If possible, negotiate a short-term guarantee (30–90 days) for major components (spindle, gearboxes).
- Ask seller to list in writing any known issues or defects.
- If the machine requires refurbishment, incorporate that into your offer (i.e. deduct estimated cost).
- Include transport, leveling, installation responsibilities in the contract.
- If possible, request that the seller assist in initial alignment or commissioning at your site.
8. Red Flags & Walk-Away Criteria
Some problems are too serious, or too uncertain, to accept without huge discounts.
- Refusal to permit full inspection, or seller restricts movement/test runs
- Excessive backlash, binding, or inconsistent motion in axes
- Spindle noise, vibration, or unacceptable runout
- Gearbox grinding, slipping, or incomplete shifting
- Headstock or bed cracks, warped or repaired castings
- Tailstock misalignment or loose quill
- Missing or severely damaged way covers, guards, or protective devices
- Critical parts missing (gears, nuts, chucks, readout)
- Electrical panel burnt, corroded, missing components
- Modifications done poorly or non-OEM that reduce rigidity or precision
- Parts or spares for this machine are unobtainable or rare
If you see multiple red flags, it may be better to walk away rather than negotiate from weakness.