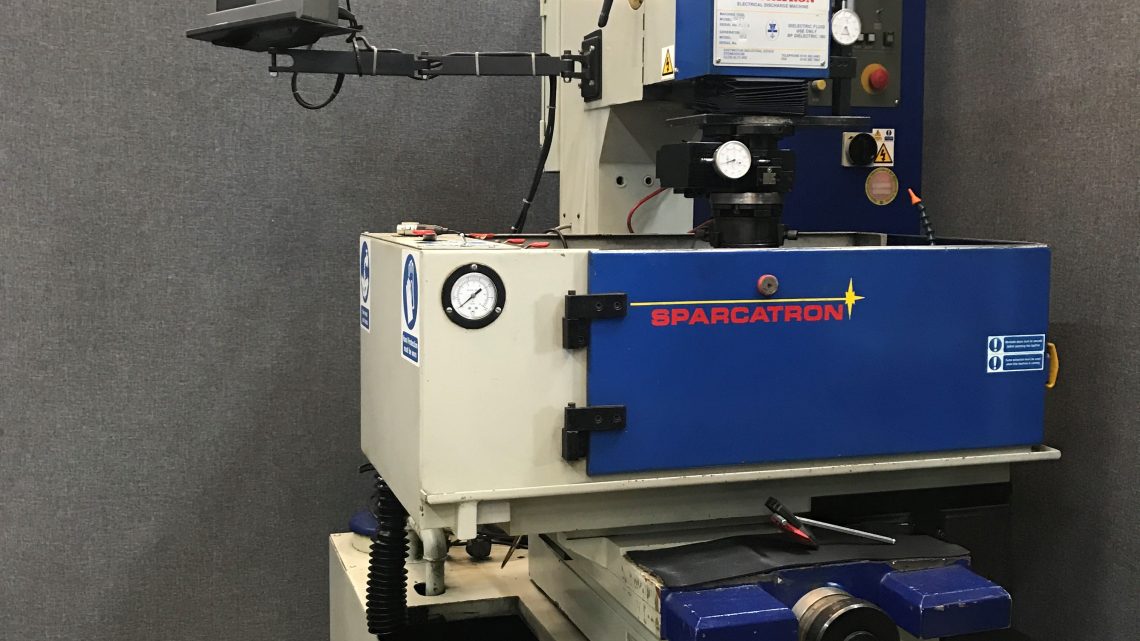
From Factory Floor to Your Workshop: Evaluating a Pre-Owned , Used , Secondhand, Surplus CNC Machines Before Purchase Sparcatron SM 27 Die Sinking EDM Machine made in UK
Below is a structured approach (plus caveats) for evaluating a pre-owned / surplus Sparcatron SM 27 die-sinking EDM . Use this as a template or checklist during your inspection, adapted for EDM machines.
Known Data / Preliminary Information about Sparcatron SM 27
Before evaluation, it’s good to gather any published specs or references. One listing shows:
- Year 1996 for a Sparcatron SM 27 unit.
- Tank size: ~ 980 × 480 × 300 mm
- Axis travels (approx): X = 300 mm, Y = 250 mm, Z = 150 mm
- Backslide (i.e. over-travel) in Z: ~150 mm
- It also indicates a 2-axis digital readout, 3R chuck, and CNC orbiting head included.
These numbers are useful “benchmarks” to compare against the machine you are evaluating.
Evaluation Framework for an EDM Machine like Sparcatron SM 27
EDM (die-sinking / cavity EDM) machines have their own failure modes and inspection foci (electrical, dielectric, pulse generator, insulation, ram, etc.), so you should emphasize certain areas beyond what a milling/turning machine needs. Here’s how I’d structure the evaluation:
1. Pre-Screening & Documentation (Remote)
Before visiting, request the following:
- Machine identity: Model, serial number, year of manufacture
- Electrical schematics, wiring diagrams, manuals, parts list
- Control / CNC / pulse generator details: Manufacturer, model, version, modifications
- Operating hours / usage history: Particularly hours under discharge, how often used, types of jobs run
- Maintenance / service records: Any repairs, component replacements, preventive maintenance
- Spare parts inventory: Are spare electronics, electrode holders, dielectric pump parts, insulation parts included?
- Photos / video of machine in operation: Ram motion, spark generation, gap stability, observable issues
- Reason for sale: For example, the shop is upgrading or the machine has known troubles
- List of accessories / extra features: e.g. orbiting head, electrode changer, C-axis, automation, tooling, dielectric filtration system, remote diagnostics
If the seller can’t or won’t provide these, that’s a red flag.
2. On-Site Inspection & Static Tests
Once you’re in front of the machine, inspect mechanically, electrically, and for dielectric / insulation conditions.
2.1 Visual / Structural & Mechanical Inspection
- Condition of frame, casting, support structure
- Check for signs of electrical breakdown: scorched insulation, discolored surfaces, burnt patches
- Examine the dielectric tank: interior surfaces, corrosion, pitting, residue, dielectric contamination
- Inspect ram / electrode holder / head: wear, scratches, damage, proper alignment, linear guide condition
- Inspect guideways / slides used for ram / axis motion for scoring, grooving, wear
- Condition of way covers / bellows / shielding (if present)
- Check wiring, cables, protective conduits, junctions for insulation damage or exposure
- Inspect pump, filter systems (dielectric pump, filters, tubing)
- Check the control cabinet / electrical enclosure cover integrity, seals, dust / moisture ingress
- Check chucks, workholding (if the unit has a 3R chuck or electrode mounting)
2.2 Electrical / Pulse Generator / Insulation / Control Inspection
- Examine the pulse generator / power supply module(s): look for burnt components, discoloration, capacitor bulging, leakage
- Check control / CNC module and interface: is the control operational, screen working, buttons responsive
- Inspect wiring, connectors, bus bars, grounding, insulation materials
- Check dielectric circulation: ensure correct flow, no blockages, no contamination
- Test insulation resistance (megger test) on the wiring, cables, electrode holder, and machine body (if safe and feasible)
- Verify control signals, interface boards, I/O modules, pulse trigger circuits
- Check whether the control allows all needed functions (gap control, servo, Z-control, electrode polarity, spark parameters)
- Test whether safety circuits (doors open, interlocks) are functional
3. Operational / Functional Testing
This is the most revealing phase. If the seller allows “live test,” push the machine through various modes.
3.1 Motion & Gap Behavior
- Jog the axes (if manual or slow feed) and see smoothness of motion
- Move the ram in Z through its full travel, watch for stick-slip or jerky motion
- Check stability of the gap servo / Z-control: does it stay stable when idle or under light spark load
- Observe electrode approach / retract behavior, whether there is hunting or oscillation
3.2 Spark / Erosion Tests
- Use a standard electrode and test a basic cavity or slot at light current, observe whether the spark is stable, arcs, or misfires
- Test different discharge modes / currents (if accessible) and observe transitions
- Measure the surface finish of the eroded test: quality, micro-cracks, recast layer, uniformity
- Try a repeated spark cycle to see whether drift, instability, or offsets develop
- Test the Z-axis drift over time – let the machine run for a period and measure whether the gap or position shifts
- Test under different electrode weights / size (if possible) to see dynamic behavior
3.3 Cooling, Dielectric & Filtration Performance
- Verify dielectric fluid cleanliness, absence of contamination, consistent flow, filtration efficiency
- Check dielectric pump performance, pressure, flow rate, whether any cavitation or air bubbles occur
- Check if there is clogging in dielectric plumbing / valves / nozzles
- Check temperature stability in dielectric, whether cooling is adequate
4. Metrology / Precision & Accuracy Tests
In EDM, geometric and drift accuracy is critical:
- Use a calibration electrode or test block to see if features are dimensionally accurate
- Run repeatability tests: move to a position, retract, return, check deviation
- Inspect flatness / parallelism of electrode to work surface
- For features such as depth accuracy, check whether commanded vs actual depth matches
- After warm-up / extended run, re-check whether dimensions shifted
5. Infrastructure, Installation & Risks
- Check how the machine is installed: leveling, base, anchoring, foundation stability
- Floor load / vibration isolation: ensure your workshop can support its weight and any shock from sparks
- Power supply: voltage, phase, stability, whether current supply is sufficient
- Cooling / HVAC / exhaust / maintenance access
- Access for rigging / removal / relocation
- Safety systems: guarding, interlocks, fire suppression (some EDMs use dielectric fluid which may entail fire risk)
6. Post-Inspection Analysis & Decision Criteria
Once you’ve collected all measurements, test results, and observations:
- Compare observed specs vs expected / published specs (e.g. does it indeed have ~300 × 250 × 150 mm travel, does the tank match ~980 × 480 × 300 mm)
- Identify defects or issues: drift, instability, insulation degradation, spark instability, mechanical wear, generator problems
- Estimate repair / refurbishment cost of replacing modules, reworking the ram, reconditioning generator, rewiring, dielectric plumbing, seals, calibration, control module repairs
- Assess risk of hidden failures (some modules like pulse generators or control boards may degrade in intermittent ways)
- Check spare parts availability: is “Sparcatron” supported, are modules interchangeably available, are there generic / aftermarket substitutes
- Evaluate agricultural resale / salvage risk: if things fail, can you replace parts, or will the whole module become scrap
- Negotiate accordingly: push for discount, demand inclusion of spare modules, express test-cut guarantee, or support after delivery
- Decide acceptance or rejection: if too many red flags or repair costs are prohibitive, walk away