Avoid Costly Mistakes: Professional Tips for Purchasing a Pre-Owned / Surplus / Second-Hand / used DEA BETA SP CMM Coordinate Measuring Machine
Here is a robust, experience-based due diligence checklist and guidance you can use when considering a used / surplus / second-hand DEA “Beta SP” (or similar gantry / bridge / CMM style) coordinate measuring machine (CMM). Because CMMs are precision metrology tools, small defects (in guideways, scales, control electronics, thermal drift, calibration) can lead to large costs, loss of accuracy, or unusability.
I’ll begin with what I found about DEA Beta SP machines in the market, then go through what you absolutely must check, functional tests, contract protections, and red flags.
What “Normal / Good” Looks Like — Reference Benchmarks for DEA Beta SP
Before you inspect, knowing reference values and features helps you spot exaggerations or misrepresentations. Some examples from used machines:
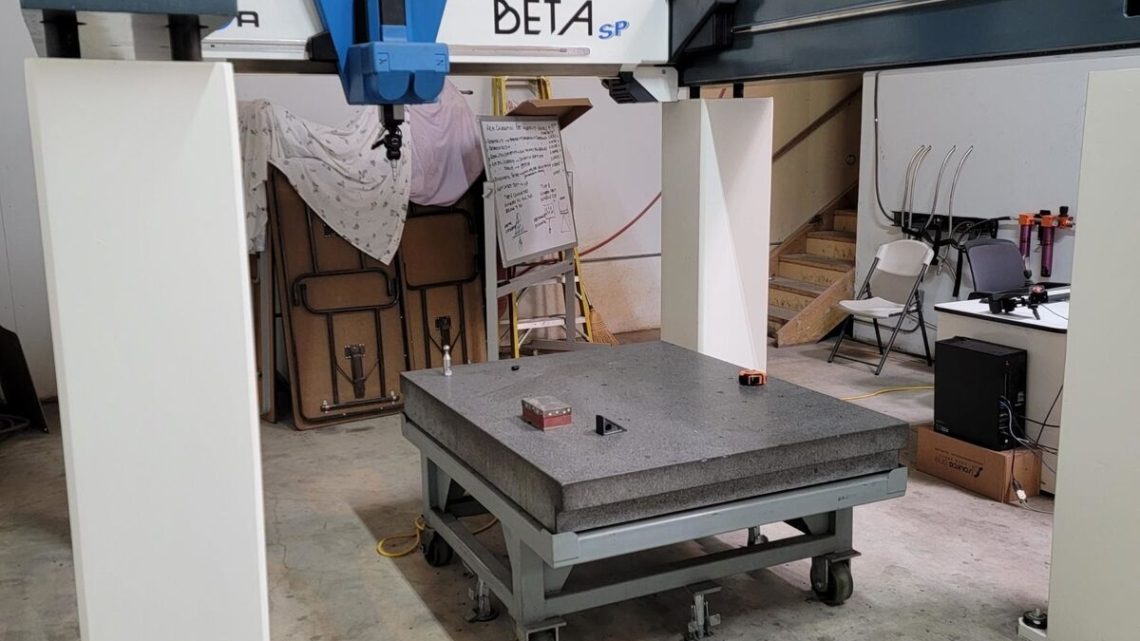
- A DEA Beta SP 25.15.10 gantry CMM (98″ × 60″ × 40″ travel) was listed with a 2020 retrofit: new scales, new controller, new joystick, etc.
- That same listing claims X = 98″, Y = 60″, Z = 40″ travel.
- Many “Beta SP” machines are gantry / bridge-style machines intended for moderate to large parts, not small tabletop CMMs.
- Some Beta SP models have been retrofitted with modern controllers (e.g. Eagle, wireless joystick) and new scale readers during those retrofits.
So as a rule of thumb, a used Beta SP may require rework in electronics or scale systems, but you want the mechanical base, guide surfaces, and structural stability to be solid. Use the claimed travel volumes as your “yardstick” and confirm that the machine physically matches (or is close to) those numbers.
Inspection & Validation Checklist: What to Check & How
Below is a detailed on-site and remote inspection checklist. Bring precision tools (laser tracker, gauge blocks, indicators, thermometers) and a test artifact if possible.
1. Documentation, History & Pre-Screening
Before or upon arrival, collect:
- Serial number, manufacture year, model variant, and any retrofit / modernization history
- Factory mechanical, electrical, and metrology schematics, wiring diagrams, parts catalogs, maintenance logs
- Control / software manuals, configuration files, backups, compensation tables, probe routines
- Calibration / alignment reports: last metrology checks, scale calibration, straightness/squareness tests
- Usage history: hours powered on, hours measuring, environment (temperature, humidity, vibration), part loads
- Photographic or video demo: motion of X, Y, Z, probe head movements, joystick control, homing, referencing
- Spare parts list or spares included: probe heads, scale modules, controller boards, cable harnesses
- Transport and disassembly requirements: machine footprint, weight, lifting points, need to remove scales or frame sections
If the seller cannot supply credible documentation or refuses a video of motion / axes, consider that a serious risk.
2. Structural & Mechanical / Guideway Integrity
This is one of the most critical parts: if the machine is skewed or guides are damaged, calibration may not recover it.
- Inspect the machine frame, bridge / gantry beams, columns, supports for cracks, weld repairs, distortions, or fatigue.
- Use a long straightedge, granite reference bar, optical flat, or laser method to check straightness / flatness of key surfaces (bridge underside, guideways, column faces).
- Move each axis (X, Y, Z) slowly through full travel (in free motion) and feel for any zones of binding, “sticking,” friction changes, or non-uniform resistance.
- If covers or way wipers are removable, inspect the guide surfaces (rail, ways, slide surfaces) for pitting, scoring, corrosion, wear flatting, edge rounding.
- Inspect the wipers / scrapers, covers / bellows: if these are missing or damaged, debris or fluid ingress may have damaged internal surfaces.
- Check any preload or adjustment mechanisms (shims, gibs, alignment screws) for integrity, adjustment freedom, and whether they are properly set.
3. Scale / Encoder / Measurement System & Readout
The heart of a CMM is the positional feedback system; any defect here undermines the entire machine.
- Identify which scale / encoder / linear measuring system is installed (linear scale, glass scale, optical encoder, absolute scales)
- Confirm that the scale modules are intact, clean, undamaged, and not scratched or cracked.
- Move axes in small increments and observe that the readout moves smoothly, with no jump, flicker, or glitch.
- Reverse direction in small steps and detect any hysteresis or repeatability error (e.g. 2 µm or less is often desired depending on machine class).
- Inspect wiring, connectors, flex cables, termination blocks, shielding for damage, brittle insulation, or cable fatigue near bends.
- If any scale units have been replaced or upgraded, confirm matching resolution and compensation.
4. Probe / Sensing / Head Mechanism & Probing System
CMM usefulness depends heavily on the probe system; test it thoroughly.
- Inspect the probe head (if motorized, indexing, multi-axis) for free motion, play, backlash, smoothness.
- Mount a known calibration sphere or gauge and perform sphere probing tests (e.g. measure diameter in multiple orientations) to check probe error, repeatability, lateral error.
- Test head indexing / tilt / rotation (if applicable) repeatedly, and check for repeatability and backlash.
- Perform stylus change / retraction / extension cycles to check probe arms, joints, and repeatability under load.
- For any automatic probe changer / module changer, cycle it many times and check for mis-indexing, slippage, or misalignment.
5. Functional & Metrology Tests / Performance Trials
This is where the machine proves if it still measures accurately.
- Use a certified artifact (e.g. gauge block set, step gauge, calibration sphere, ring gauge) to measure known features, compare reported values vs true values.
- Perform repeated measurement runs (e.g. measuring the same point or sphere 10+ times) to assess repeatability.
- Across large travel, measure known distances and compare with expected. Test for linearity, scale error, and drift.
- Test cross-axis motion: e.g. move in X then Y then back etc., measure any error coupling.
- Run a full inspection cycle (multi-axis, multiple features) and compare to CAD or golden standard to test geometric accuracy.
- Perform warm-up cycles (hours of operation) then re-check geometry or measurement drift to detect thermal effects.
- If possible, introduce intentional metrology “challenges” (tilted surfaces, curved surfaces) and see whether the machine can reliably measure them.
6. Environmental, Thermal & Vibration Considerations
Even a mechanically perfect CMM can fail under poor environment.
- Check ambient room for temperature stability, airflow, vibration sources (nearby machining, fans, HVAC).
- Check the machine’s foundation, floor flatness, isolation, whether it was installed on a stable base.
- Measure temperature gradients across the machine (especially if parts are long).
- Look for signs of drift or hysteresis when repeating measurements over time.
- Check whether any prior operator had shielding, thermal compensation, or built-in thermal correction logic.
7. Electrical / Control / CNC / Software
Even if mechanics are good, the control side can fail or become obsolete.
- Power the machine up gradually; check for any fault lights, error codes, power surges, or unstable behavior.
- Inspect the control cabinet: wiring harnesses, power supplies, connectors, shielding, cable management. Look for burnt traces, brittle insulation, repairs or splices.
- Boot the control software: test user interface, parameter screens, backup & restore functions, diagnostics, error logs.
- Jog axes via controller / joystick / operator interface, see if motion matches commanded moves, is smooth, responsive, with no stutter or lag.
- Test referencing / homing routines, limit switches, reference sensors, safety interlocks, emergency stops.
- Confirm that all software, compensations, probe routines, calibration files, offsets, configuration files are included.
- Verify whether the control hardware is still supportable (spare boards, CPU, drives) or if it’s obsolete.
- If possible, test a retrofit or upgrade feasibility (if the older control is failing).
8. Contractual Safeguards & Warranty / Guarantee Terms
Because latent errors may show only after a few months, you must protect your investment legally.
- Insist on conditional acceptance: the final payment (or a holdback) should depend on passing metrology accuracy tests.
- Define quantitative acceptance criteria: allowable measurement error, repeatability thresholds, drift tolerances, probe accuracy specs.
- Ask for a short warranty / guarantee period (e.g. 30 to 90 days) on critical systems (scales, probes, controller).
- Require delivery of complete documentation: mechanical & electrical schematics, calibration logs, software backups, probe routines, parts lists.
- Clarify who pays for transport, rigging, leveling, building a stable base, installation, and re-validation / calibration.
- Insert a “burn-in / validation period” clause: any defects or lost accuracy found during first production-mapping / usage must be remedied by seller.
- Get written disclosures of known defects, prior repairs, control or scale replacements, history of damage or accidents.
9. Red Flags & Deal-Breaker Conditions
These are warning signs that should make you walk away (or demand a massive discount + strong warranties):
- Seller refuses full access (enclosures, axes, control cabinet) or denies metrology / test cycles.
- Mechanical frame is distorted, cracked, warped, or shows signs of heavy abuse or in-field repair without calibration records.
- Guide surfaces (ways, rails) with deep scoring, pitting, corrosion, or missing wipers/protectors.
- Scale modules with visible damage, scratch marks, or replaced beyond recognition without documentation.
- Feedback / scale signals flickering or dropping out during test motion.
- Probe head with large backlash, loose joints, mis-indexing, or repeatability out of spec.
- The control hardware / electronics are severely outdated, nonfunctional, or unserviceable / no spares.
- Motion that is non-smooth, stutters, hesitation in axes.
- Failure to repeat the same measurement (repeatability test) within expected tolerances.
- Significant drift or change in measurements after warm-up or over time.
- Missing or incomplete documentation (no calibration logs, no software backups, no schematics).
- No spare modules / parts for the control, scales, probe systems.
- Environmental dependencies too high (temperature, vibration) and the machine was in a poor environment.
- Hidden damage or modifications done without documentation or calibration afterward.